Pot a plant correctly to ensure its health and beauty. Whether you want to refresh your decor or your plant has outgrown its current home, understanding the process is key. This article delves into the essential steps and best practices for repotting your plants, ensuring they thrive in their new environment.
Why Repotting is Essential for Plant Health
Repotting is not just about switching containers; it’s about providing your plants with the optimal conditions they need to flourish. Over time, soil loses its nutrients, roots become constricted, and plants can become pot-bound. Regular repotting every 12 to 18 months allows you to refresh the soil, encourage growth, and maintain a vibrant and healthy plant.
Signs That Indicate It’s Time to Repot
Identifying the right moment for repotting is essential for plant health. Here are some key signs that suggest your plant needs a new pot:
- Roots Growing Through the Drainage Holes: If you notice roots escaping through the drainage holes, it’s time to give your plant more room.
- Roots Pushing the Plant Upward: This indicates that the roots are becoming too crowded, pushing the plant out of its container.
- Slower Growth: If your plant’s growth has stalled despite adequate light and water, it might be time for a change.
- Top-Heavy Plants: Plants that topple easily may need a more secure base or a larger pot.
- Frequent Drying: If your plant dries out unusually fast, it may indicate that the roots have filled the pot and can’t absorb water effectively.
- Overgrown Aboveground Parts: If the aboveground portion of your plant takes up more than three times the pot space, it’s time for a larger container.
- Salt and Mineral Build-Up: Noticeable crust on the surface of the soil or pot indicates that the plant needs fresh soil.
Choosing the Right Planter
When selecting a new planter, size is crucial. Follow these guidelines to choose the appropriate pot:
- Tabletop Planters: When changing planters, select a new pot that is no more than 2 inches larger in diameter than the current one.
- Floor Planters: For larger plants, a new pot can be up to 4 inches larger in diameter.
- Small Plants: If you are dealing with a very small plant, a planter that is just 1 inch larger may suffice.
Essential Materials for Potting a Plant
To ensure a smooth repotting process, gather the following materials:
- New Houseplant: This could be the plant you’re repotting or a new one you wish to introduce.
- New Planter: Make sure it has drainage holes, or choose a suitable alternative.
- Fresh Potting Mix: Opt for a high-quality mix that suits the specific needs of your plant.
- Lava Rocks or Similar: If your new planter lacks drainage holes, these will help create a barrier for excess water.
Step-by-Step Guide on How to Pot a Plant
Step 1: Remove the Plant from Its Current Pot
To begin the repotting process, gently remove the plant from its current container:
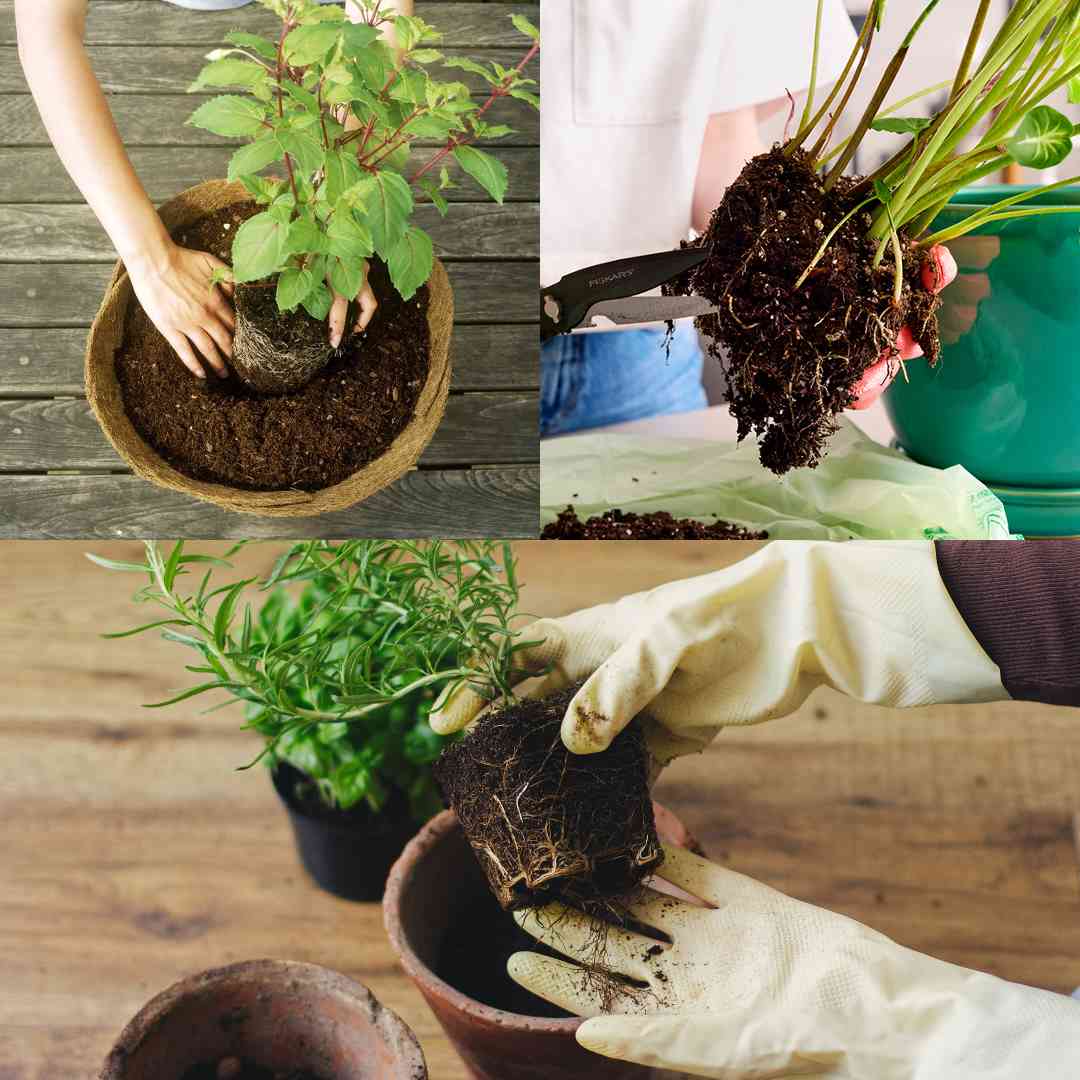
- Position the Plant: Hold the plant sideways, ensuring that you support the base gently.
- Tap the Pot: Lightly tap the bottom of the pot until the plant slides out. If necessary, give the base of the stems a gentle tug to help it out.
Step 2: Loosen the Roots
Once the plant is out, it’s time to tend to the roots:
- Gently Separate the Roots: Use your hands to loosen any tightly bound roots. This step is crucial for promoting root health and preventing root rot.
- Trim Excess Roots: If you encounter long, threadlike roots, trim them while leaving the thicker roots intact to maintain the plant’s stability.
Step 3: Remove Old Potting Mix
Next, refresh the soil surrounding the plant:
- Remove Old Soil: Take off about one-third or more of the old potting mix. This refreshes the plant’s nutrient supply and prevents any toxic buildup from old soil.
Step 4: Add New Potting Mix
Now, it’s time to add the fresh soil:
- Layer the New Potting Soil: Pour a layer of the new potting mix into the new planter. Press it down gently to eliminate air pockets, ensuring the soil is compact yet breathable.
- Create a Drainage Layer: For planters without drainage holes, layer the bottom with lava rocks or gravel before adding the potting mix. This allows excess water to pool away from the roots, preventing waterlogging.
Step 5: Add the Plant
With the new potting mix in place, you can now introduce the plant:
- Center the Plant: Position the plant on top of the fresh layer of mix, ensuring it is centered within the pot.
- Secure the Plant: Gradually add more potting mix around the plant, ensuring it is secure without overpacking the soil. The roots need space to breathe and grow.
Step 6: Water and Enjoy
After potting, it’s essential to care for the plant properly:
- Even Out the Soil: Make sure the soil surface is even and level, which promotes healthy moisture retention and water absorption.
- Water Generously: Give the plant a thorough watering, allowing the water to drain out of the bottom. This helps settle the soil around the roots and provides necessary moisture.
- Avoid Fertilizing Immediately: A freshly repotted plant doesn’t require fertilization right away. Allow the plant to acclimate to its new environment for a few weeks before introducing any nutrients.
Best Practices for Repotting Success
To ensure the best outcomes when repotting your plants, consider the following best practices:
- Timing: The ideal time for repotting is during the spring, just before the growth season begins. This allows your plants to recover and thrive in their new environment.
- Cleanliness: Always use clean tools to avoid introducing diseases or pests to your plants. Sterilize pots and tools with rubbing alcohol or boiling water.
- Soil Choice: Choose a potting mix that is specific to your plant type. For example, succulents require well-draining soil, while tropical plants thrive in rich, moisture-retentive mixes.
- Observation: After repotting, monitor your plants closely for any signs of stress. Adjust watering and light exposure as needed to help them adapt.
Common Mistakes to Avoid When Potting a Plant
While repotting is straightforward, some common mistakes can hinder plant health:
- Over-Potting: Using a pot that is too large can lead to overwatering and root rot. Stick to the recommended size guidelines to avoid this issue.
- Ignoring Drainage: Always ensure your new planter has proper drainage. This prevents water from pooling and helps maintain optimal moisture levels.
- Skipping Root Inspection: Failing to check the roots can lead to problems. Always inspect and loosen them to promote healthy growth.
- Neglecting to Water: After repotting, some may forget to water adequately. Ensure the plant receives sufficient moisture to settle into its new home.
Mastering the Art of Potting Plants
By following these detailed steps on how to pot a plant, you can significantly enhance the health and aesthetics of your indoor greenery. Repotting not only rejuvenates the plant’s environment but also ensures it has the nutrients and space to grow. Remember to observe your plants closely and adjust care practices as needed for continued success.
Incorporate these tips into your plant care routine, and you will enjoy thriving, beautiful plants that elevate your living space. Happy potting!
FAQs
How do you pot a plant for beginners?
Potting a plant as a beginner can be an easy and rewarding process! Here’s a simple step-by-step guide to get you started:
- Gather Your Materials: You will need a new pot with drainage holes, fresh potting mix suited to your plant type, and possibly some rocks for drainage if your pot lacks holes.
- Remove the Plant from Its Current Pot: Gently hold the plant sideways and tap the bottom of the pot to loosen the soil and roots. Carefully slide it out.
- Prepare the New Pot: Add a layer of potting mix to the bottom of the new pot. If using rocks, place them at the bottom first for drainage.
- Position the Plant: Center the plant in the new pot, ensuring it sits at the same depth as it was in its original pot.
- Fill with Soil: Add potting mix around the plant, pressing it down lightly to eliminate air pockets. Be careful not to pack it too tightly.
- Water the Plant: After potting, water the plant thoroughly to help settle the soil and provide moisture.
- Place in the Right Location: Put the newly potted plant in an appropriate location based on its light and temperature requirements.
Can you put a plant directly into a pot?
Yes, you can put a plant directly into a pot, but there are a few things to keep in mind:
- Choose the Right Pot: Ensure the pot has adequate drainage holes to allow excess water to escape. Without drainage, the plant can suffer from root rot.
- Use Fresh Potting Mix: Always use a high-quality potting mix appropriate for the specific plant type. This ensures that the plant receives the right nutrients.
- Consider the Plant’s Size: Make sure the pot is appropriately sized for the plant. It should be large enough to accommodate the root system but not so large that it leads to overwatering.
How to pot a new plant?
Potting a new plant is similar to repotting, but you start from scratch. Here’s how to do it:
- Select a Suitable Pot: Choose a pot that is the right size and has drainage holes.
- Prepare the Potting Mix: Fill the bottom of the pot with fresh potting mix.
- Place the Plant: Remove the new plant from its nursery container. If it’s root-bound, gently loosen the roots. Position the plant in the center of the new pot.
- Add More Potting Mix: Fill around the plant with potting mix, ensuring it is secure and at the correct depth.
- Water Thoroughly: After potting, water the plant well to help settle the soil.
- Acclimate the Plant: Place the newly potted plant in an appropriate location based on its light and temperature needs.
Do you need rocks at the bottom of a planter?
Using rocks at the bottom of a planter is not always necessary but can be beneficial in specific circumstances:
- For Pots Without Drainage Holes: If your planter lacks drainage holes, adding a layer of rocks or gravel can help prevent water from accumulating at the bottom, which reduces the risk of root rot.
- Improving Drainage: In pots with drainage holes, using rocks can still aid in drainage by preventing the soil from blocking the holes. However, it’s essential to note that rocks alone do not substitute for proper drainage.
- Soil Type: If you are using a soil mix that retains a lot of moisture, adding a layer of rocks can help improve air circulation and drainage.


