Planting apple seeds is a rewarding and educational experience, whether you’re looking to grow your own orchard or experiment with a small garden project. While most apple trees are grafted to ensure consistent fruit quality, growing apple trees from seeds can still produce beautiful trees with unique characteristics. This guide will walk you through the process of how to plant apple seeds from preparation to transplanting, ensuring that you have all the necessary steps to achieve successful germination and growth.
Sowing Apple Seeds: Timing and Preparation
Before you begin planting apple seeds, it’s important to understand the right conditions to ensure successful germination. Apple seeds require a period of cold, moist conditions to break their dormancy, a process called cold stratification. This can be achieved naturally by planting in late autumn, or artificially by using a refrigerator.
Choosing the Best Time to Plant Apple Seeds
The best time to plant apple seeds is during autumn, fall, or winter. The cooler temperatures during these seasons mimic the natural conditions apple seeds need to germinate. However, if you’re planting in a warmer climate or outside of these seasons, you can use a refrigerator to create the ideal conditions.
Preparing Apple Seeds for Planting
Before planting, it’s essential to prepare the apple seeds to maximize your chances of success. Here are the steps:
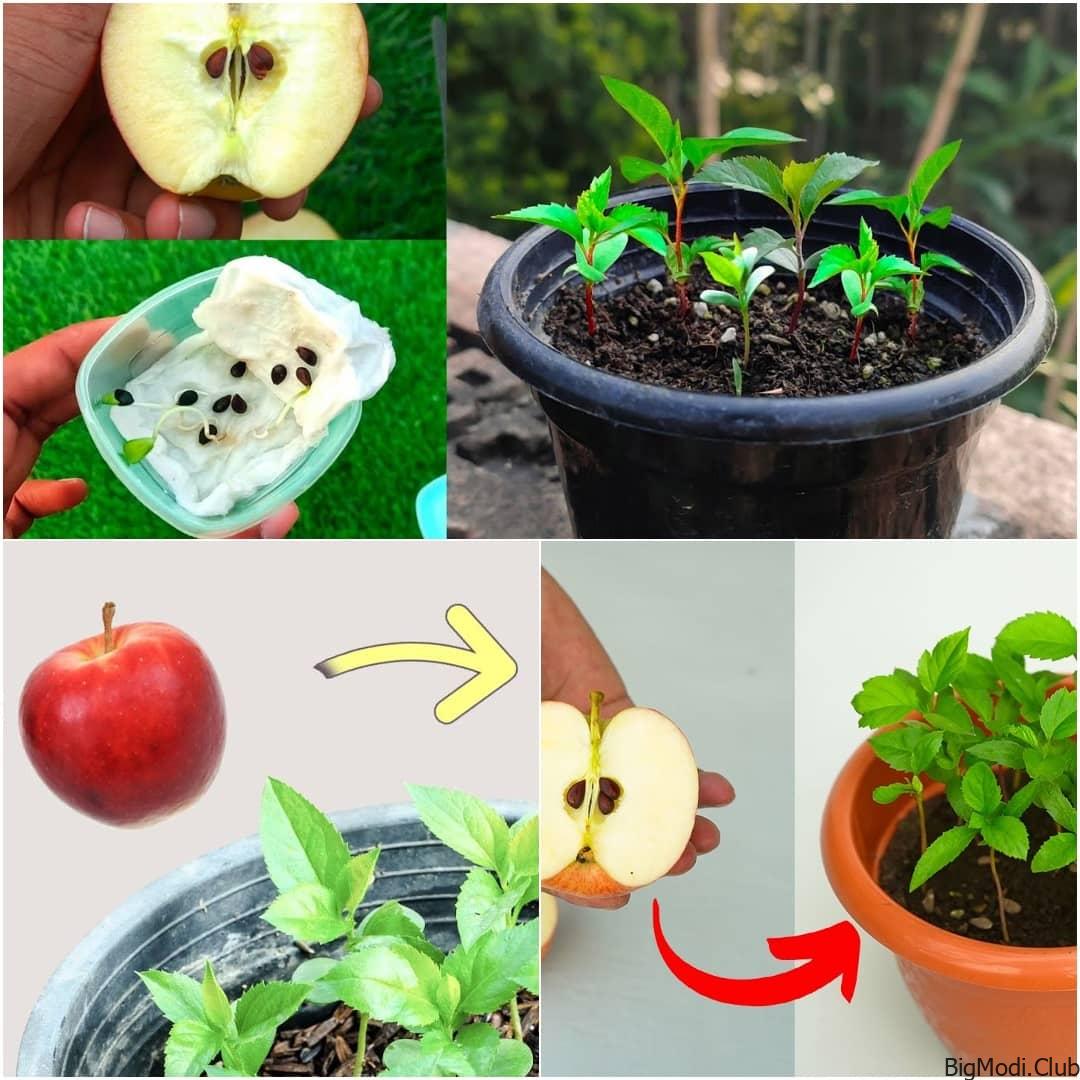
- Soak the Seeds: Place the apple seeds in a bowl of cool water and let them soak for one hour. This helps to soften the outer layer and initiate the germination process.
- Plant Multiple Seeds: Because only about a third to half of the seeds will sprout, it’s important to plant as many seeds as possible. This will increase your chances of success.
Methods for Preparing Apple Seeds
There are two common methods to prepare apple seeds for planting:
- Method 1: Kitchen Paper Method
- Moisten a piece of kitchen paper and place the seeds on it.
- Fold the paper over and place it in a sealable plastic bag.
- Add a moist sponge to the bag to prevent drying out.
- Method 2: Sand Stratification Method
- Use a margarine tub or similar container and place a layer of moist sand at the bottom.
- Spread the seeds on top of the sand, then cover with another layer of moist sand.
- Punch small holes in the lid of the container to allow for air circulation, and then seal it.
Cold Stratification: Breaking Dormancy
Once your apple seeds are prepared, they need to undergo cold stratification to break their dormancy. Cold stratification is essential to mimic the winter season, which naturally triggers the seed to start sprouting when the conditions warm up.
- Temperature: Keep the seeds at a temperature of 3°-5°C (37°-41°F) for 6-8 weeks.
- Storage: Place the plastic bag or container with the seeds either outside (if the climate is cool enough) or in a refrigerator. Make sure to check regularly to ensure the seeds remain moist throughout this period.
Planting Apple Seeds: Getting Ready for Growth
After the cold stratification period, it’s time to plant your apple seeds. Follow these steps carefully to ensure proper planting:
Planting Depth and Potting
- Depth: Plant the seeds 1 1/2 cm (1/2 inch) deep in a small pot. Ensure the pot is filled with well-watered, good quality potting compost.
- Pots: It’s recommended to use 4-inch pots to give the seeds enough room to develop without being overcrowded.
- Location: Place the pots in a cold frame, a sheltered south-facing spot, or under a bell cloche outdoors. These setups help protect the seeds while giving them the right conditions to germinate.
Watering and Care
- Watering: It’s crucial to keep the soil moist but not waterlogged. Water slowly to avoid dislodging the seed from its planted position.
- Temperature for Germination: Germination typically takes 2 to 3 weeks once temperatures consistently reach 23°C (75°F). At this point, you’ll begin to see the seedlings emerge.
Caring for Apple Seedlings: Growth and Re-Potting
Once your apple seeds have germinated and the seedlings start to grow, it’s important to continue providing them with the right care to ensure strong, healthy plants.
Re-potting the Seedlings
When the seedlings reach about 5 cm (2 inches) tall and have developed a set of mature leaves, it’s time to re-pot them. Here’s how:
- Re-potting: Move each seedling to an individual 5-inch pot filled with garden soil. This provides enough space for the roots to continue growing.
- Root Pruning: If you want to encourage the development of feeder roots, consider pruning the roots during the re-potting process. Brush off the soil from the roots and snip off about one-third of their length using clean garden snips. This will stimulate new root growth.
Continued Care for Seedlings
After re-potting, grow the seedlings in partial shade to protect them from the intense sun. Water them regularly, aiming for a good weekly watering to keep the soil consistently moist without becoming soggy.
Throughout the first growing season, your apple seedlings will continue to grow and develop, preparing them for the final stage: transplanting.
Transplanting Apple Seedlings: Moving to Their Permanent Location
Once your seedlings have grown strong and nighttime temperatures are consistently above 10°C (50°F), it’s time to transplant them to their final location outdoors.
Choosing the Right Location
- Space Requirements: Depending on the variety of apple tree you’re growing, your tree could grow anywhere from 20 to 30 feet tall. Make sure to choose a spot in your garden with enough space for the tree to thrive.
- Soil and Sunlight: Apple trees require well-drained soil and at least 6 hours of direct sunlight daily. Ensure the location meets these requirements for optimal growth.
Transplanting Process
- Digging the Hole: Dig a hole wide and deep enough to accommodate the seedling’s roots without crowding them.
- Planting: Place the seedling in the hole, making sure it’s upright and the roots are spread out. Cover the roots with soil and gently press down to remove air pockets.
- Watering: After transplanting, water the tree thoroughly to help the roots establish themselves in their new location.
Final Thoughts on Growing Apple Trees from Seed
Growing an apple tree from seed is a long-term project, but the results can be truly rewarding. Not only will you potentially produce a fruit-bearing tree, but you’ll also have a beautiful tree that provides shade, blossoms, and a haven for pollinators.
If you’re looking to plant an apple tree but prefer a more reliable fruit-bearing variety, consider purchasing a grafted tree.
FAQs:
How do you prepare apple seeds for planting?
To prepare apple seeds for planting, first soak them in cool water for about an hour. After soaking, you can either place the seeds between moist paper towels inside a sealable plastic bag or bury them in moist sand inside a container. Both methods require keeping the seeds in a cold environment (around 3°-5°C or 37°-41°F) for 6-8 weeks, a process known as cold stratification, to break dormancy and encourage germination.
Should you soak apple seeds before planting?
Yes, soaking apple seeds before planting is recommended. Soaking them in cool water for about an hour helps soften the seed coat, initiating the germination process and improving the chances of successful sprouting.
How do you dry apple seeds for planting?
After removing the seeds from the apple, rinse them to remove any fruit residue. Spread the seeds out on a paper towel and allow them to air dry for a day or two in a cool, dry location. However, keep in mind that for apple seeds to germinate, they require cold stratification, so drying is only a short preparatory step before the cold treatment.
Do apple seeds need sunlight?
Apple seeds do not need sunlight to germinate. In fact, they should be kept in a cool, dark place during the cold stratification process. Once the seeds have sprouted and seedlings emerge, they will then need sunlight to grow, but direct exposure should be limited during the early stages to avoid stress.