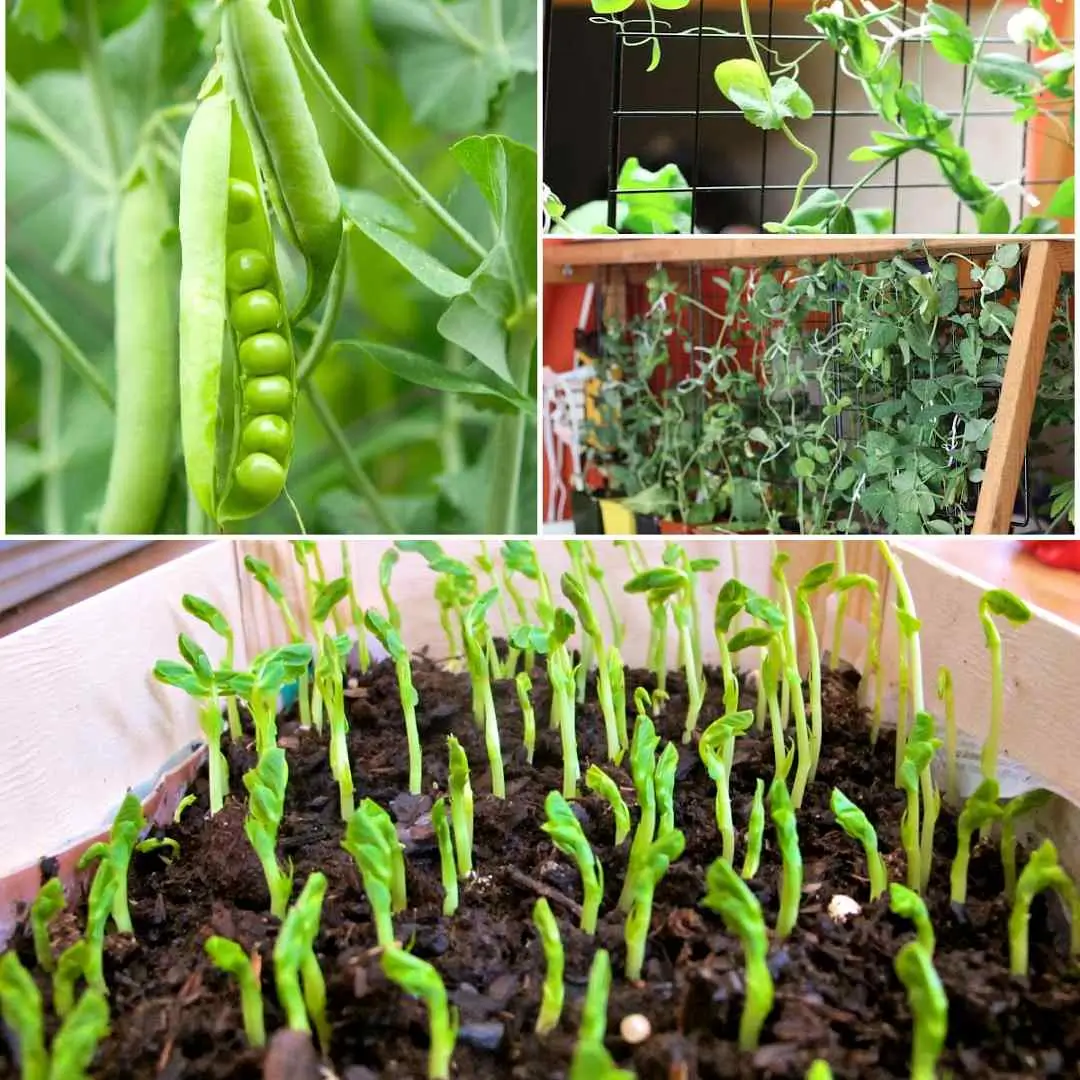
Grow Peas successfully in your garden, and you’ll be rewarded with a delicious, versatile crop that’s beloved by many gardeners. Whether you’re cultivating peas for their sweet seeds or their edible pods, they’re a joy to grow and a nutritious addition to any meal. In this guide, I’ll walk you through everything you need to know about how to grow peas—from selecting the right varieties to planting, caring for, and harvesting your crop. Ready to dive into the world of peas? Let’s get started!
About Peas
Peas are part of the legume family, and their ability to fix nitrogen in the soil makes them a valuable addition to any garden. When you grow peas, you’re not just cultivating a delicious crop, but you’re also enriching the soil for future plants. Peas come in three main varieties: sweet peas (also known as garden or English peas), snap peas, and snow peas. Each type provides a unique gardening and culinary experience, but no matter which variety you choose, they all share one key feature—they are relatively easy to grow peas. That said, peas do have a short growing window, so timing is critical when it comes to planting.
Easy to Grow
One of the great things about growing peas is how easy they are to cultivate. Whether you’re a beginner or an experienced gardener, peas won’t give you much trouble. They don’t require a lot of space or attention, and with just a little effort, they reward you with a bountiful harvest.
Planting Time
Peas thrive in cool weather, which is why they should be planted early in the spring. For most of the U.S. and Canada, this means planting in February, March, or April. In warmer regions, you can grow peas as a fall or even winter crop. Once the weather turns hot, peas tend to stop producing, so the key is to get them in the ground early to mature while the temperatures are still cool.
Freshness
Nothing beats the taste of freshly harvested peas. However, peas don’t stay fresh for long after being picked, so it’s best to enjoy them as soon as possible. The flavor of peas begins to deteriorate soon after harvest, which is why store-bought peas often don’t taste as sweet as the ones you grow yourself.
Types of Peas
When it comes to peas, there are three main varieties to choose from:
Sweet Peas (Garden Peas or English Peas)
These are the classic peas that you shell from their inedible pods. Sweet peas are harvested when the seeds inside the pod are plump but still tender. Their pods are discarded, and only the peas are eaten. Popular varieties include ‘Green Arrow,’ ‘Lincoln,’ and ‘Little Marvel.’
Snow Peas
Snow peas have flat, edible pods that are harvested while the peas inside are still small and immature. These peas are commonly used in stir-fries and salads. Some well-known varieties are ‘Mammoth Melting Sugar’ and ‘Oregon Sugar Pod II.’
Snap Peas
Snap peas are a cross between sweet peas and snow peas. Both the pods and the peas inside are edible, and they are harvested when the pods are full but still crisp. They have a sweet, juicy flavor, making them a popular snack straight from the garden. Some of the best varieties include ‘Sugar Ann’ and ‘Super Sugar Mel.’
Planting Peas
Now that we know the types of peas, let’s dive into the specifics of planting them. Understanding when, where, and how to plant peas is key to getting the most out of your crop.
Location
Peas thrive in full sun, so choose a sunny location in your garden. While they can tolerate partial shade, peas grown in full sun will produce sweeter, more productive plants. The soil should be well-draining, as peas don’t like soggy roots.
Soil Preparation
Preparing the soil ahead of time is crucial for growing peas successfully. It’s best to prepare the soil in the fall by mixing in aged manure or compost, which will provide the necessary nutrients for your peas to thrive. Adding mulch to the soil will also help with moisture retention and weed suppression.
When to Plant
Peas should be sown 4 to 6 weeks before the last frost of the spring. They thrive in cool soil, with 40°F being the minimum temperature for germination. However, if the soil is between 60°F and 85°F, peas will germinate much faster. For gardeners in warmer climates, you can plant a second crop in late summer or early fall, about 6 to 8 weeks before the first expected frost.
How to Plant Peas
Direct Seeding
Peas don’t like their roots disturbed, so it’s best to grow peas by direct seeding. If you’re looking for an ideal spot to grow peas, raised garden beds are perfect, particularly in regions where the spring season is long and wet. Raised beds provide better drainage, ensuring your peas thrive without sitting in soggy soil.
Soak Seeds
To speed up germination, it’s a good idea to soak pea seeds in water overnight before planting. This will give them a head start in absorbing moisture, which is especially helpful if the soil is on the dry side.
Depth & Spacing
Sow pea seeds about 1 inch deep in the soil. If your soil is particularly dry, you can plant them slightly deeper. Space the seeds about 2 inches apart in rows that are 7 inches apart. There’s no need to thin the plants, as peas don’t mind growing close together.
Crop Rotation
To keep your soil healthy and fertile, avoid planting peas in the same spot more than once every four years. This helps prevent the buildup of pests and diseases and ensures your soil doesn’t become exhausted of nutrients.
Support
Peas come in both bush and pole varieties. Bush peas grow to about 18-30 inches tall, while pole peas can reach heights of 4-6 feet. Both types benefit from support. Use trellises, chicken wire, or even twiggy sticks to give your peas something to climb on.
Caring for Peas
Once your peas are planted, they require minimal care, but a little attention goes a long way in ensuring a healthy, productive crop.
Watering
Peas don’t like soggy soil, so water them sparingly. About 1 inch of water per week is sufficient unless the plants are wilting. It’s important to keep the soil moist but not waterlogged, as letting the plants dry out completely can prevent pod formation.
Weeding
Peas have shallow roots, so be gentle when weeding around them. Hand-weeding is best to avoid disturbing the roots. Keeping the area around your peas weed-free will reduce competition for nutrients and water.
Mulching
Mulching is one of the best things you can do for your peas. A deep mulch of grass clippings or shredded leaves helps retain moisture in the soil, keeps the roots cool, and reduces the need for fertilization. Mulching also helps to suppress weeds, which is essential when growing peas.
Types of Peas: Varieties to Consider
When deciding which variety of peas to grow, consider factors like your climate, garden space, and how you plan to use the peas. When you grow peas, selecting the right variety is key to success. Here’s a closer look at some popular varieties of peas to help you make the best choice:
Shelling Peas (Garden/Sweet Peas)
- ‘Green Arrow’: A reliable variety with high yields and excellent flavor.
- ‘Lincoln’: Known for its heat tolerance and sweet peas.
- ‘Wando’: A hardy variety that can tolerate warmer temperatures.
- ‘Thomas Laxton’: An heirloom variety with large, sweet peas.
- ‘Little Marvel’: Perfect for small gardens, with a compact growth habit.
Snap Peas
- ‘Sugar Ann’: An early-maturing variety with sweet, crunchy pods.
- ‘Sugar Snap’: A classic snap pea with large, juicy pods.
- ‘Early Snap’: Produces peas early in the season with a crisp texture.
- ‘Super Sugar Mel’: A heavy-yielding variety with sweet, full pods.
Snow Peas
- ‘Mammoth Melting Sugar’: A large-podded variety with tender, sweet pods.
- ‘Oregon Sugar Pod II’: Known for its disease resistance and crisp pods.
- ‘Snowbird’: A compact variety with early yields.
Harvesting Peas
Timing is everything when it comes to harvesting peas. Picking them at the right stage ensures maximum flavor and tenderness.
When to Harvest
Peas are typically ready for harvest 60-70 days after planting. Each variety has a slightly different harvesting window:
- Snow Peas: Harvest when the pods are flat, and the peas inside are still small.
- Snap Peas: Pick when the pods are plump but still glossy.
- Shell Peas: Harvest when the peas inside the pod are full-sized but before the pods become waxy.
Harvest Technique
The best time to harvest peas is in the morning after the dew has dried. This is when the pods are at their crispiest. Use two hands to pick the peas—one hand to hold the plant and the other to gently pull the pod off. This helps avoid damaging the plant, which can reduce future yields.
Storing Peas
Once you’ve harvested your peas, it’s time to decide how you want to enjoy them. Fresh peas are a real treat, but they won’t last long, so you’ll need to act quickly to preserve their flavor and texture.
Short-Term Storage (Refrigeration)
If you’re planning to use your peas within the next few days, store them in the refrigerator. Place them in paper bags, then wrap the bags in plastic to help retain moisture. Peas stored this way can stay fresh for up to five days.
Long-Term Storage (Freezing)
For longer storage, freezing is your best option when you grow peas. To freeze peas, start by blanching them—briefly boiling them for one to two minutes—then plunging them into ice water to stop the cooking process. Once cooled, drain the peas thoroughly and freeze them in airtight containers or freezer bags. When you grow peas, freezing them this way allows them to last for up to a year, preserving their sweet flavor and tender texture for future meals.
Growing peas is a rewarding experience that can bring fresh, flavorful vegetables to your table. From selecting the right variety to ensuring optimal growing conditions, you now have all the knowledge you need to grow peas successfully in your garden. Remember to plant early, give your peas the support they need, and harvest them at the perfect time to enjoy their natural sweetness.
So, what are you waiting for? Get those seeds in the ground and start your pea-growing journey today!
FAQs
1. How to grow peas at home?
To grow peas at home, start by selecting a sunny location with well-draining soil. Prepare the soil by mixing in aged manure or compost, then sow the seeds about 1 inch deep and 2 inches apart, with rows spaced 7 inches apart. Water regularly to keep the soil moist but not soggy, and provide support for taller varieties if needed. Ensure you plant early in spring or during cooler seasons for the best results!
2. How long do peas take to grow?
Peas typically take about 60 to 70 days to grow peas from planting to harvest. The exact time may vary depending on the variety you choose, but most peas will be ready to pick about two months after sowing.
3. Do peas need to climb?
Yes, certain types of peas, especially pole varieties, benefit from climbing structures like trellises or stakes. These grow peas can reach 4 to 6 feet tall and will require support to keep them upright, which helps improve air circulation and reduces disease risk.
4. What is the secret to growing peas?
The secret to grow peas successfully lies in timing and care. Plant them early in the spring when the soil is cool, ensure they have well-draining soil rich in organic matter, and provide consistent moisture without overwatering. Regular harvesting will also encourage your plants to produce more pods. Lastly, using companion planting strategies can help deter pests and promote healthy growth.


