
Hey there, fellow green thumb! Have you ever bitten into a perfectly ripe, juicy mango, its sweet, tropical flavor exploding on your tongue, and thought, “I wish I could grow one of these in my own backyard?” Well, what if I told you that dream is not only possible but also a incredibly rewarding journey? Forget those expensive, store-bought saplings! Today, we’re going on an adventure that starts with a humble mango pit and ends with the potential for your very own tropical oasis.
You might be thinking, “Really? From a seed? Sounds complicated.” And sure, it requires a little patience and a dash of know-how, but trust me, the satisfaction of nurturing a mango tree from its very beginnings is unparalleled. Imagine plucking your own sun-kissed mangoes, knowing you brought them to life. Pretty cool, right?
This isn’t just about planting a seed; it’s about connecting with nature, understanding the magic of growth, and potentially adding a stunning, fruit-bearing gem to your garden. So, are you ready to unlock the secrets of mango propagation? Let’s dig in and learn exactly how to grow a mango tree from seed!
The Mango Dream: Why Bother Growing from Seed?
Before we get our hands dirty, let’s address the elephant in the room. Why go through the effort of starting from a seed when you can buy a grafted tree? Good question!
First off, it’s incredibly cost-effective. A single mango can provide you with the starting material for free! Secondly, there’s an immense sense of accomplishment and pride in watching something grow from nothing. It’s like raising a plant baby! Thirdly, for those in warmer climates, growing from seed can be a fantastic way to experiment with different varieties and potentially discover a truly unique tree adapted to your local conditions.
Now, a quick heads-up: A tree grown from seed might not produce fruit identical to the parent tree. This is because mangoes are often cross-pollinated. However, for many, the joy is in the journey and the unique character of their homegrown tree. And who knows, you might even discover a new favorite!
Getting Started: The Anatomy of a Mango Seed
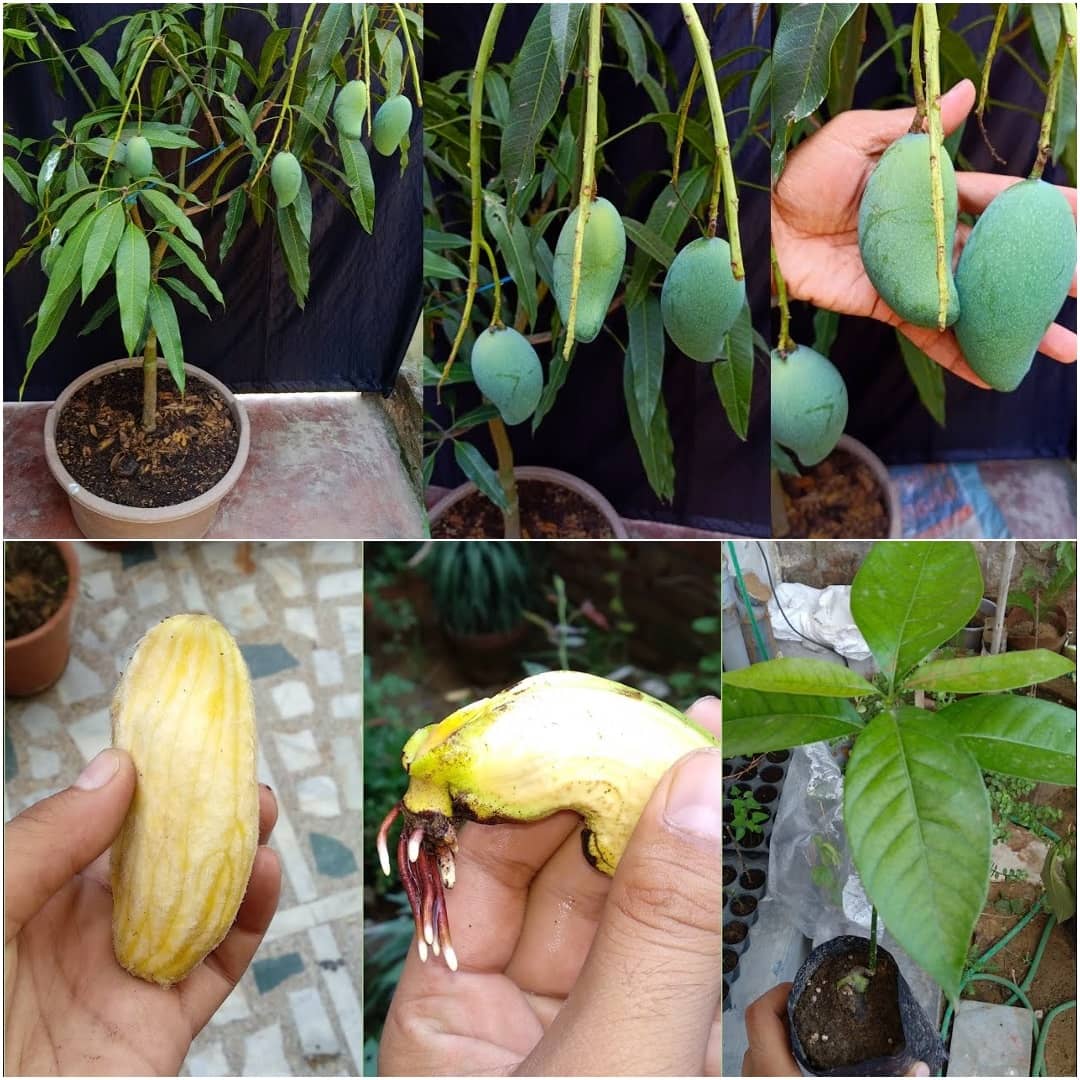
Before we plant, let’s understand what we’re dealing with. Inside that fibrous, yellowish “pit” you usually toss, lies the actual mango seed. This outer husk protects the precious embryo within. Our first mission is to liberate that seed!
Choosing Your Champion Mango: The Fresher, The Better!
This is perhaps the most crucial first step. Your success hinges on the quality of your source material.
- Go for a ripe, fresh mango: The riper the mango, the more mature and viable the seed is likely to be. Organic is often preferred, but any fresh, store-bought mango will do.
- Avoid dried or bruised mangoes: These seeds are less likely to germinate successfully.
- Consider varieties (if you can): While most common grocery store mangoes (like Ataulfo, Tommy Atkins, Kent, Haden) will work, some varieties are polyembryonic (producing multiple seedlings from one seed) while others are monoembryonic (producing one seedling). Polyembryonic varieties (like Ataulfo, Carabao, or Manila) often give you a higher chance of success as you might get a true-to-type seedling. Monoembryonic varieties (like Tommy Atkins, Kent, Haden) are more likely to produce a unique hybrid. Don’t stress too much about this if you’re just starting out; any viable seed is a win!
The Great Escape: Preparing Your Mango Seed for Planting
This is where the real fun begins! We need to extract the actual seed from its tough outer shell. There are a couple of popular methods:
Method 1: The “Husk It” Approach (My Personal Favorite!)
This method is quick, clean, and generally yields excellent results.
- Enjoy your mango! First things first, eat the delicious fruit! Scrape off as much of the remaining fruit flesh from the pit as possible. A quick rinse under running water helps.
- Dry the pit: Let the pit dry for a day or two in a well-ventilated area. This makes it less slippery and easier to handle.
- Carefully open the husk: This is the tricky part, so be gentle!
- Locate the flatter, concave side of the pit.
- Using a sharp, sturdy knife (a utility knife or a strong paring knife works well), carefully make a shallow cut along the edge of the pit, just enough to pierce the outer husk. Always cut away from yourself!
- Once you have a small opening, gently pry open the husk with your fingers or a flat screwdriver. It’s like opening a stubborn oyster!
- Inside, you’ll find the actual bean-shaped seed, often covered in a thin, papery skin. This is your treasure!
- Remove the papery skin (optional but recommended): Gently peel off this thin outer layer. This can sometimes speed up germination.
Method 2: The Soaking Method (A Bit Slower, But Works!)
This method involves softening the husk before attempting to open it.
- Clean the pit: As before, clean off any remaining fruit flesh.
- Soak the pit: Place the entire pit in a container of lukewarm water for about 24-48 hours. Change the water daily to prevent mold.
- The gentle crack: After soaking, the husk will be softer. You can then try to carefully crack it open as in Method 1, or sometimes, you might even be able to gently snip open an edge with sturdy scissors.
- Extract the seed: Once open, carefully remove the internal seed.
No matter which method you choose, you’re now holding the key to your future mango tree!
Sprouting Success: Encouraging Germination
Now that you have your precious mango seed, it’s time to coax it into life. There are a few ways to germinate a mango seed, each with its own merits.
Option 1: The Paper Towel Method (Great for Observing Progress!)
This method is fantastic if you want to see the root emerge firsthand.
- Gather your supplies:
- Your clean, extracted mango seed.
- Paper towels.
- A sealable plastic bag (ziploc bag works perfectly).
- A spray bottle with water.
- Dampen the paper towels: Thoroughly moisten 2-3 sheets of paper towel, ensuring they are damp but not dripping wet.
- Wrap the seed: Place the mango seed in the center of the damp paper towels and fold them securely around the seed.
- Into the bag: Place the wrapped seed inside the plastic bag. Seal the bag, leaving a tiny corner open for air circulation.
- Find a warm spot: Place the bag in a warm location, ideally between (). This could be on top of a refrigerator, in a warm cabinet, or on a heat mat if you have one.
- Patience and vigilance: Check the seed every few days. Re-dampen the paper towels if they start to dry out. Within 1-4 weeks, you should see a root emerging from one end of the seed. Once the root is about 1-2 inches long, it’s time to plant!
Option 2: The Direct Planting Method (Less Fuss, But Slower to See Results)
If you prefer a more hands-off approach, you can plant the seed directly.
- Prepare your pot: Choose a pot that is at least 6-8 inches in diameter with good drainage holes. Mangoes develop a long taproot, so depth is more important than width initially.
- Use well-draining soil: A good quality potting mix designed for tropical plants or general container gardening works well. You can amend it with perlite or sand for extra drainage.
- Planting orientation: This is crucial! Plant the seed with the “eye” (where the root will emerge) facing downwards, or horizontally if you’re unsure. The convex (rounded) edge of the seed should be slightly exposed or just at the soil surface, with the flatter side facing down. Plant it about 1 inch deep.
- Water thoroughly: Water the soil gently until water drains from the bottom of the pot.
- Warmth and light: Place the pot in a warm location with bright, indirect sunlight. Keep the soil consistently moist but not waterlogged.
- Wait and watch: Germination can take anywhere from 2 weeks to 2 months with this method.
Planting Your Sprouted Success: Giving Your Seedling a Home
Once your mango seed has successfully sprouted a root (or if you’ve opted for direct planting), it’s time to give it a proper home.
Choosing the Right Container: Potting Up Your Young Tree
- Initial Pot Size: For a newly germinated seed, a 6-8 inch deep pot is sufficient. As your tree grows, you’ll need to pot it up to larger containers.
- Material: Terracotta pots allow for better air circulation and drainage, but plastic pots also work fine. Just ensure ample drainage holes.
- Drainage: This cannot be stressed enough. Mangoes hate “wet feet.” Ensure your pot has multiple drainage holes. You can add a layer of gravel or broken pottery at the bottom, though this isn’t strictly necessary if your potting mix drains well.
The Perfect Potting Mix: Fueling Growth
- Well-draining is key: Use a high-quality potting mix that drains well. A mix designed for citrus or palms can be ideal.
- Composition: A good mix usually contains peat moss, perlite, vermiculite, and compost. Avoid heavy garden soil, which can compact and retain too much moisture, leading to root rot.
- pH Level: Mangoes prefer slightly acidic to neutral soil, with a pH between 6.0 and 7.0.
The Planting Process: Gentle Hands for Delicate Roots
- Prepare the pot: Fill your chosen pot about two-thirds full with your well-draining potting mix.
- Create a depression: Make a small depression in the center of the soil, large enough to accommodate the sprouted seed without bending its delicate root.
- Carefully place the seed: Gently place your sprouted mango seed into the depression, ensuring the root is pointing downwards. If planting a non-sprouted seed, remember the “eye” down/horizontal orientation.
- Cover with soil: Lightly cover the seed with about an inch of potting mix. Don’t compact the soil too much.
- Water gently: Water thoroughly but gently until water drains from the bottom. This helps settle the soil around the seed.
- Label your pot: It’s always a good idea to label your pot with the planting date.
Nurturing Your Mango Seedling: The Road to a Young Tree
Congratulations! You’ve got a planted seed. Now comes the ongoing care to ensure your little mango plant thrives.
Light Requirements: Sun-Loving Specimens
- Bright, Indirect Light Initially: For the first few weeks, your seedling needs bright, indirect sunlight. A south-facing window (in the Northern Hemisphere) or a spot with filtered light is ideal.
- Gradual Acclimation to Full Sun: Once your seedling has developed a few sets of true leaves and is robust, you can gradually introduce it to more direct sunlight. Mangoes are tropical plants and love full sun (at least 6-8 hours daily) once established. Acclimate them slowly to prevent sunburn.
Watering Wisdom: The Balance is Key
- Consistency is Crucial: Keep the soil consistently moist, but never soggy. Allow the top inch or two of soil to dry out slightly between waterings.
- Check Before Watering: Stick your finger into the soil. If it feels dry, it’s time to water. If it still feels moist, wait.
- Drainage, Drainage, Drainage: Again, ensure excess water can drain freely from the pot. Standing water is a death sentence for mango roots.
- Reduce Watering in Winter: If you’re growing indoors in a cooler climate, reduce watering during the dormant winter months.
Humidity: A Tropical Treat
- High Humidity Preferred: Mangoes thrive in high humidity. If you live in a dry climate or are growing indoors, consider misting your plant daily or placing it near a humidifier. A pebble tray filled with water can also help increase local humidity.
Fertilization: Feeding Your Future Fruit Provider
- Go Easy on Young Seedlings: Avoid fertilizing your seedling for the first 3-6 months. The potting mix usually contains enough nutrients to get it started.
- Balanced Fertilizer for Growth: Once your seedling is established and actively growing, you can begin feeding it with a balanced, all-purpose liquid fertilizer (e.g., 8-8-8 or 10-10-10) diluted to half strength.
- Frequency: Fertilize every 2-4 weeks during the growing season (spring and summer). Reduce or stop fertilization during fall and winter.
- Nutrient Deficiencies: Keep an eye out for yellowing leaves (nitrogen deficiency), purplish leaves (phosphorus deficiency), or scorched leaf edges (potassium deficiency).
Temperature: Keeping it Cozy
- Tropical Lovers: Mango trees are true tropicals. They thrive in warm temperatures, ideally between ().
- Frost is the Enemy: They are very sensitive to cold and frost. If you live in a climate with cold winters, you’ll need to grow your mango tree in a container and bring it indoors when temperatures drop below ().
Pruning and Training: Shaping Your Future Tree
- Pinch Back for Bushiness: When your seedling is about 12-18 inches tall, you can pinch back the main stem to encourage branching and a bushier growth habit. This helps create a stronger tree structure.
- Remove Lower Leaves (Optional): Some growers like to remove the lowest leaves as the stem hardens, but this isn’t strictly necessary.
- No Heavy Pruning for Young Trees: Avoid heavy pruning until your tree is more mature.
Pest and Disease Watch: Keeping an Eye Out
- Common Pests: Watch out for common houseplant pests like spider mites, aphids, mealybugs, and scale insects, especially if growing indoors.
- Early Detection is Key: Inspect your plant regularly. If you spot any pests, treat them promptly with insecticidal soap or neem oil.
- Fungal Issues: Overwatering can lead to fungal issues. Ensure good air circulation and proper drainage.
The Long Game: What to Expect as Your Mango Tree Grows
Growing a mango tree from seed is a marathon, not a sprint. Here’s a glimpse into the journey ahead:
Growth Rate: Slow and Steady Wins the Race
- Initial Spurt: Your seedling will have an initial growth spurt.
- Varied Growth: Growth rates vary depending on the variety, growing conditions, and care. Some trees can grow several feet a year in ideal conditions, while others are slower.
- Container Limitations: Trees grown in containers will naturally be smaller than those planted in the ground.
Repotting: Giving Roots Room to Roam
- When to Repot: Repot your mango tree to a larger container when you see roots emerging from the drainage holes or if its growth seems stunted.
- Gradual Increase: Increase the pot size gradually, usually by 2-4 inches in diameter each time. Avoid putting a small plant directly into a huge pot, as this can lead to waterlogging.
- Best Time: Spring or early summer is the best time for repotting, when the tree is actively growing.
Fruiting from Seed: The Waiting Game
This is where patience truly pays off.
- Long Wait: Mango trees grown from seed typically take much longer to fruit than grafted trees. It can take anywhere from 5 to 10 years, or even longer, for a seed-grown mango tree to produce its first fruit.
- Variability: Remember, a seed-grown tree may not produce fruit identical to the parent, and some may never fruit at all, especially if they are monoembryonic varieties. However, many do eventually yield delicious fruit!
- Monoembryonic vs. Polyembryonic Reminder: If you’re growing a polyembryonic variety (like Ataulfo), your chances of getting a “true-to-type” fruit (similar to the parent) are much higher, and they may fruit sooner.
Overwintering Indoors: For Colder Climates
If you live outside USDA hardiness zones 10-11, you’ll need to bring your mango tree indoors for the winter.
- Before Frost: Bring it inside before temperatures consistently drop below ().
- Sunny Spot: Place it in the brightest, sunniest spot you have, ideally a south-facing window. Supplemental grow lights can be very beneficial.
- Reduced Care: Reduce watering and stop fertilizing during the winter months. The tree will enter a period of dormancy.
- Pest Check: Thoroughly check for pests before bringing it indoors, as they can quickly spread in the indoor environment.
Troubleshooting Common Mango Growing Problems
Even the most dedicated gardener can encounter bumps in the road. Here are a few common issues and how to tackle them:
- Yellowing Leaves:
- Overwatering: Most common cause. Check soil moisture.
- Nutrient Deficiency: If consistently watered correctly, consider a balanced fertilizer.
- Lack of Light: Move to a brighter spot.
- Brown Leaf Tips:
- Lack of Humidity: Increase humidity around the plant (misting, pebble tray).
- Salt Buildup: Flush the soil with plain water occasionally to remove excess salt from fertilizers or tap water.
- No Germination:
- Non-viable Seed: The seed may not have been viable. Try again with a fresh mango.
- Temperature: Not warm enough.
- Too Wet/Too Dry: Ensure consistent moisture in the paper towel or soil.
- Leggy Growth:
- Insufficient Light: Your tree is stretching for light. Move it to a brighter location.
- Pests:
- Identification: Identify the pest (spider mites, aphids, etc.).
- Treatment: Use insecticidal soap, neem oil, or horticultural oil as directed.
Beyond the Basics: Advanced Tips and Considerations
Grafting: Speeding Up Fruiting
While this article focuses on growing from seed, it’s worth noting that once your seedling is a few years old and has a healthy rootstock, you can consider grafting a known fruiting variety onto it. Grafting significantly shortens the time to fruiting and ensures you get fruit true to the scion variety. This is a more advanced technique but a rewarding one for serious enthusiasts.
Multiple Seedlings from One Pit (Polyembryony)
As mentioned, some mango varieties are polyembryonic, meaning one seed can produce multiple seedlings. If this happens, carefully separate them once they are large enough to handle, taking care not to damage the roots. Each seedling can grow into its own tree.
What to Do with Your Tree if You Can’t Plant it Outdoors
Many of us live in climates where outdoor mango cultivation isn’t feasible. Don’t despair!
- Container Gardening: Mango trees can live happily in large containers for many years. You’ll just need to prune them to maintain a manageable size and repot them regularly.
- Dwarf Varieties: If buying a grafted tree in the future, look for dwarf or semi-dwarf varieties that are better suited for container growing.
- Greenhouse Growing: If you have access to a greenhouse, that’s an excellent environment for mangoes in colder regions.
The Sweet Reward: Your Homegrown Mangoes
Imagine this: years from now, you step into your garden, or maybe your sunroom, and there it is – your very own mango tree, laden with ripe, colorful fruits. The scent of tropical sweetness fills the air. You carefully pluck a mango, feel its slight give, and know that you brought this magnificent plant to life from a humble seed.
This isn’t just about fruit; it’s about the journey, the connection, and the incredible satisfaction of growing something truly special. So, whether you end up with a prolific fruit-bearer or a beautiful, leafy specimen, you’ve created something wonderful.
Ready to Start Your Mango Journey?
The call of the tropics is strong, isn’t it? You now have all the knowledge you need to embark on this exciting horticultural adventure. From understanding the mango seed to nurturing your young tree, you’re equipped for success.
So, what are you waiting for? Grab a ripe mango, enjoy its juicy goodness, and let’s turn that pit into a paradise! Your future self (and taste buds!) will thank you. Get out there, get your hands dirty, and begin your journey to growing a magnificent mango tree from seed today! Happy planting!
FAQs
How long does it take to grow a mango tree from seed?
Growing a mango tree from seed typically takes 5-10 years to fruit, but initial germination can be seen in 2-8 weeks. Patience is key for homegrown tropical fruit!
How do you prepare a mango seed for planting?
Clean the pit, then carefully crack open its fibrous husk to extract the inner bean-shaped seed. You can also soak the whole pit for 24-48 hours to soften it before opening.
What is the fastest way to grow a mango tree?
The fastest way to grow a mango tree for fruit is often by planting a grafted sapling. Growing from seed is rewarding but takes longer to fruit (5-10+ years), as seed-grown trees may not be true to type.
Can you grow a mango seed in just water?
Yes, you can sprout a mango seed in water! Submerge the cleaned, de-husked seed halfway in water, changing it every few days. Once roots and a shoot appear, transfer to soil.