Ever bitten into a dish bursting with that rich, savory garlic flavor and thought, Could I grow this myself? If you’re nodding, you’re in the right place! Growing garlic cloves at home is easier than you might think, and it’s a game-changer for your kitchen and garden. Whether you’re a newbie gardener or a seasoned green thumb, this guide will walk you through every step of growing garlic from cloves, with tips to ensure a thriving harvest. Ready to dig in? Let’s get those garlic bulbs sprouting!
Garlic isn’t just a kitchen staple; it’s a low-maintenance crop that rewards you with fresh, aromatic bulbs you can’t find in stores. In this article, we’ll cover how to grow garlic cloves, from picking the right variety to harvesting those plump bulbs. We’ll sprinkle in expert advice, practical tips, and even a few stories from my own backyard to keep things relatable. By the end, you’ll be itching to plant your own garlic patch!
Why Grow Garlic Cloves at Home?
Why bother growing garlic when you can grab a bulb at the grocery store? Well, for starters, homegrown garlic tastes way better—think bold, nuanced flavors that elevate your cooking. Plus, it’s budget-friendly, eco-conscious, and downright satisfying to pull a bulb from your own soil. Garlic is also packed with health benefits, like boosting immunity and fighting off colds. Who wouldn’t want that in their backyard?
Here’s what makes growing garlic cloves a no-brainer:
-
Low maintenance: Garlic practically grows itself with minimal fuss.
-
Space-friendly: You can plant it in small garden beds, raised beds, or even containers.
-
Year-round reward: Plant in fall, harvest in summer, and enjoy fresh garlic all year.
-
Versatile varieties: From spicy hardneck to mild softneck, there’s a garlic for every taste.
Ready to grow your own? Let’s break it down step by step.
Step-by-Step Guide How to Grow Garlic Cloves
Step 1: Choose the Right Garlic Variety
Not all garlic is created equal! There are two main types: hardneck and softneck. Hardneck garlic, like Rocambole or Porcelain, produces a flowering stalk (scape) and has bold, complex flavors—perfect for gourmet dishes. Softneck garlic, like Artichoke or Silverskin, stores longer and is great for braiding. For beginners, softneck is forgiving, while hardneck thrives in colder U.S. climates.
Pro tip: Buy certified disease-free garlic bulbs from a local nursery or online supplier. Grocery store garlic might be treated to prevent sprouting, so skip it. Varieties like Chesnok Red (hardneck) or California Early (softneck) are great for U.S. gardens.
Step 2: Pick the Perfect Planting Time
Timing is everything! In most U.S. regions, fall is the best time to plant garlic cloves—think October or November, about 4-6 weeks before the ground freezes. This gives the cloves time to establish roots before winter. In warmer climates (like USDA zones 9-10), you can plant in early spring, but fall planting yields bigger bulbs.
Why fall? The cold triggers vernalization, a process that helps garlic cloves develop into full bulbs. I learned this the hard way when I planted too late one spring and ended up with tiny bulbs—lesson learned!
Step 3: Prepare Your Soil Like a Pro
Garlic loves loose, well-draining soil rich in organic matter. Think of it as a cozy bed for your cloves to snuggle into. Here’s how to prep your garden:
-
Test your soil: Aim for a pH between 6.0 and 7.0. Most U.S. garden centers sell simple soil test kits.
-
Add compost: Mix in aged compost or well-rotted manure to boost nutrients.
-
Loosen up: Till or fork the soil to a depth of 8-12 inches to help roots spread.
-
Avoid soggy spots: Garlic hates wet feet, so choose a spot with good drainage.
Last year, I neglected my soil prep and ended up with stunted bulbs. Don’t make my mistake—give your garlic the VIP treatment with nutrient-rich soil!
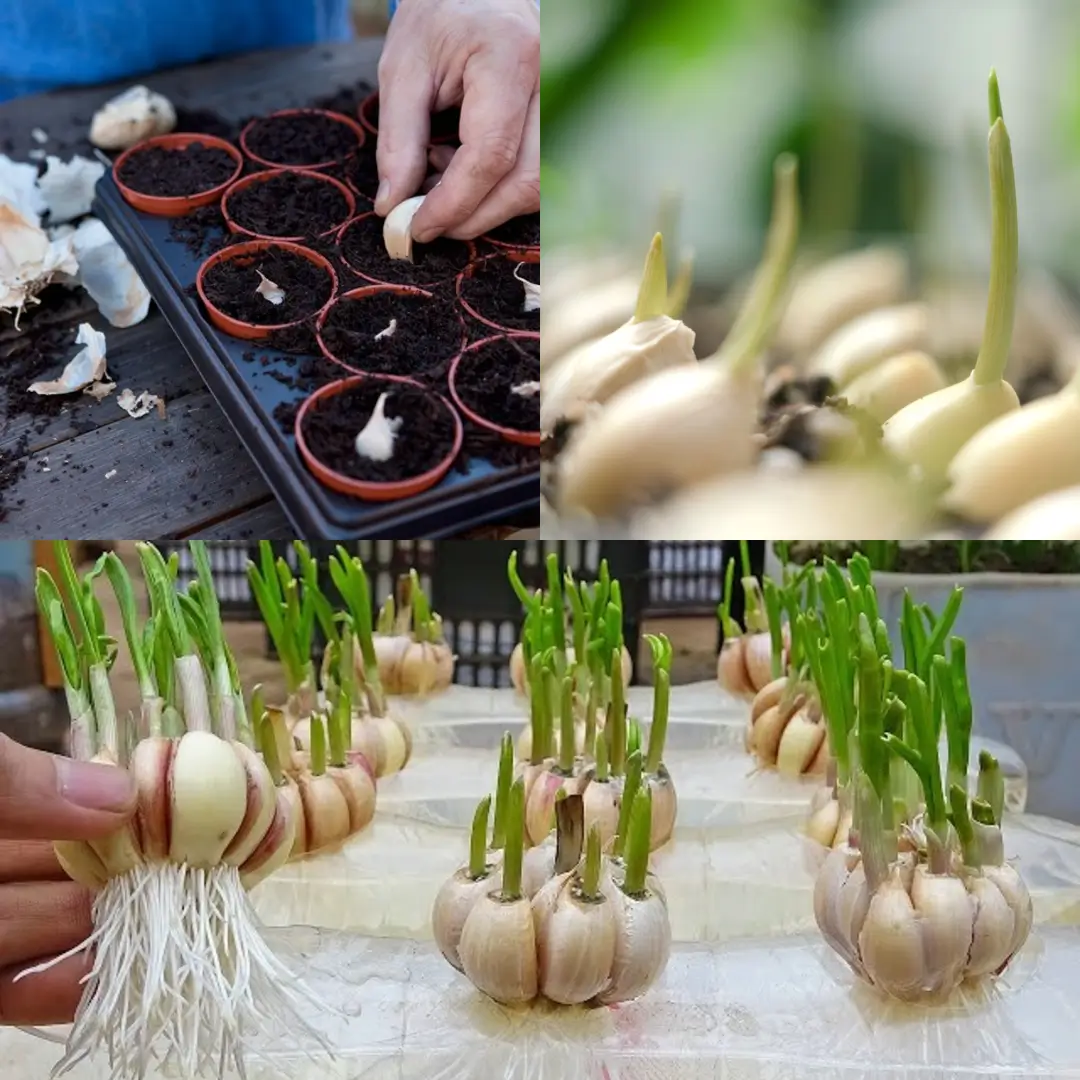
Step 4: Plant Your Garlic Cloves
Now for the fun part—planting! Break your garlic bulb into individual cloves, keeping the papery skin on. Each clove will grow into a full bulb, so choose the largest, healthiest ones.
Here’s how to plant:
-
Spacing: Plant cloves 4-6 inches apart in rows 12 inches apart.
-
Depth: Push each clove 2 inches deep, pointy end up.
-
Cover: Gently cover with soil and pat it down.
-
Mulch: Add 3-4 inches of straw, leaves, or grass clippings to insulate against winter cold.
I like to imagine each clove as a tiny seed of flavor, just waiting to burst into a full bulb. Plant with care, and you’ll be rewarded!
Step 5: Water and Feed Your Garlic
Garlic isn’t needy, but it does like consistent care. Water regularly—about 1 inch per week—especially in spring when growth kicks into high gear. If you’re in a dry region, like parts of California, a drip irrigation system works wonders.
Feed your garlic with a balanced fertilizer (like 10-10-10) or compost tea in early spring. Avoid high-nitrogen fertilizers, as they can lead to lush leaves but small bulbs. I once overdid the nitrogen and ended up with gorgeous green tops but puny garlic—oops!
Step 6: Manage Pests and Diseases
Garlic is pretty tough, but it’s not invincible. Keep an eye out for:
-
White rot: A fungal disease that causes bulbs to rot. Rotate crops and use clean bulbs to prevent it.
-
Aphids: These tiny pests can weaken plants. Blast them off with a hose or use neem oil.
-
Onion maggots: Cover plants with row covers to keep these pests at bay.
Regularly check your plants, and don’t be afraid to get your hands dirty. A healthy garlic patch is a happy one!
Step 7: Harvest Like a Pro
When do you know your garlic is ready? For most U.S. regions, harvest time is late spring to early summer (June or July). Look for these signs:
-
Hardneck garlic: The lower 2-3 leaves turn brown, and the scapes curl.
-
Softneck garlic: About half the leaves are yellowing.
To harvest, gently loosen the soil with a garden fork and pull the bulbs out. Brush off excess dirt, but don’t wash them yet. My first harvest felt like unearthing treasure—each bulb was a little victory!
Step 8: Cure and Store Your Garlic
Curing is the secret to long-lasting garlic. Hang your bulbs in a dry, well-ventilated spot (like a garage or shed) for 2-4 weeks. Trim the roots and stalks once the outer skins are papery.
Store your garlic in a cool, dry place (50-60°F) in mesh bags or baskets. Softneck garlic can last up to 8 months, while hardneck lasts about 4-6 months. I keep mine in a pantry, and it’s like having a flavor bank at my fingertips!
Practical Tips for Garlic-Growing Success
Want to take your garlic game to the next level? Here are some insider tips:
-
Rotate crops: Don’t plant garlic in the same spot every year to avoid soil-borne diseases.
-
Cut scapes: For hardneck garlic, snip the curly scapes in spring to boost bulb size (and use them in stir-fries!).
-
Test small batches: Try a few varieties to see what grows best in your climate.
-
Companion planting: Plant garlic near roses or tomatoes to deter pests naturally.
I once planted garlic near my strawberries, and the pests stayed away—it was like garlic was the garden’s bouncer!
Common Mistakes to Avoid
Even seasoned gardeners slip up sometimes. Here’s what not to do:
-
Planting too shallow: Cloves need to be 2 inches deep to avoid frost damage.
-
Overwatering: Soggy soil leads to rot, so keep it moderate.
-
Harvesting too early: Wait for those telltale yellow leaves to ensure full bulb development.
-
Using grocery store garlic: It might not sprout or could introduce diseases.
Learn from my early days—I once yanked my garlic too soon and ended up with mini bulbs that barely flavored a dish!
Fun Facts About Garlic
Did you know garlic has a wild history? Ancient Egyptians used it to boost strength, and medieval folks thought it warded off vampires. Today, it’s a superstar in kitchens and gardens across the U.S. Here are a few tidbits:
-
Garlic is part of the Allium family, alongside onions and leeks.
-
The U.S. grows over 400 million pounds of garlic annually, with California leading the pack.
-
Garlic scapes are edible and make a killer pesto!
FAQs About Growing Garlic Cloves
Can I grow garlic in pots?
Absolutely! Use a pot at least 12 inches deep with good drainage. Plant 3-4 cloves per pot and follow the same care steps.
How long does it take to grow garlic?
From planting to harvest, expect 8-9 months. Patience pays off with big, juicy bulbs!
Can I plant garlic in spring?
Yes, but fall planting is better for larger bulbs, especially in colder U.S. zones.
Why are my garlic bulbs small?
Small bulbs can result from poor soil, late planting, or not enough water. Prep your soil well and plant on time!
Your Garlic Adventure Awaits!
So, what’s stopping you? Growing garlic cloves is a rewarding journey that transforms your garden and your cooking. With just a few cloves, some soil, and a sprinkle of patience, you’ll be harvesting bulbs that make your dishes sing. Picture yourself pulling up a plump bulb, brushing off the dirt, and grinning at your homegrown success. Ready to make it happen?
Grab some quality garlic bulbs, pick a sunny spot, and get planting this fall. Share your progress with fellow gardeners, experiment with recipes using your harvest, and savor the fruits (or bulbs) of your labor. Let’s grow some garlic magic together!