A Complete Guide on How to Grow Cantaloupe in Containers and Vertically

Learning how to grow cantaloupe successfully involves understanding various stages from planting to harvesting. In this guide, we’ll walk you through everything you need to know about growing this delicious fruit, from selecting the right variety to optimizing your growing conditions. We’ll cover how to grow cantaloupe effectively, including tips on timing, soil preparation, and maintenance.

How to Grow Cantaloupe

Cantaloupe Variety: Tasty Bites

If you’re looking for a cantaloupe variety with a unique tropical flavor, “Tasty Bites” is an excellent choice. This smaller variety packs a sweet punch, making it a favorite for those who enjoy a more exotic taste in their melons.

Growing Timeline: From Seed to Transplant

The journey of growing cantaloupe began on February 27, when the seeds were carefully planted. By March 21, these seeds had transformed into healthy transplants, ready to be introduced to the garden. The key to this success lies in the method used to start the seeds.

Starting Seeds: The Right Beginning

Seeds were initially planted in a styrofoam tray, akin to the black prop tech trays commonly used by gardeners. These trays are not only reusable but also effective in preventing seedlings from becoming root-bound. Ensuring that the seedlings were well-rooted but not restricted was crucial for a smooth transition to the garden.

Transplant vs. Direct Seed: A Head Start in Growth

One of the major advantages of transplanting cantaloupe is the head start it provides. Transplants mature approximately two weeks faster than those directly seeded. In regions like the Deep South, where the summer heat can be intense, transplanting allows the melons to mature before the scorching temperatures arrive, often around the 4th of July.

Weed Control: Managing the Vines

Cantaloupes, being vining plants, present a unique challenge when it comes to weed control. To tackle this, the “lazy garden system” was employed. This system uses weed fabric with pre-cut x’s and slots to minimize weed growth. Additionally, the fabric is designed to accommodate a plug-and-play irrigation system, making the process even more efficient.

Planting Method: Giving Vines Room to Grow

Proper spacing is vital for healthy cantaloupe growth. The plants were spaced two feet apart within rows, with rows themselves spaced four feet apart. This arrangement provides ample room for the vines to spread out, while irrigation lines were strategically laid to ensure each plant receives adequate water.

Soil Preparation: Laying the Foundation

Before planting, the soil was enriched with a layer of compost and a complete organic fertilizer. This preparation ensured that the soil was nutrient-rich and ready to support the growing cantaloupes.

Maintenance: Ensuring Proper Irrigation

To prevent water pooling, the irrigation lines were installed beneath the weed fabric. This system was thoroughly tested for leaks, and the mainline was flushed out to ensure smooth operation. Proper irrigation is essential for cantaloupe, as it helps maintain consistent soil moisture without oversaturation.

Planting Procedure: The Final Step

The transplants were carefully placed in the pre-cut slots in the fabric, with the surrounding soil gently firmed up to provide support. This method ensures that the plants are securely anchored and ready to thrive.

Best Time to Plant Cantaloupe

Cantaloupe thrives in warm weather, so timing is everything when it comes to planting. It’s crucial to wait until temperatures have sufficiently warmed in the spring before planting.

  • Direct Sowing: Sow seeds outside about two weeks after the last frost date when soil temperatures reach around 65°F (18°C).
  • Low Desert of Arizona: In this region, the ideal planting window extends from February 15 through July.
  • Cooler Zones: Start seeds indoors approximately three weeks before the intended outdoor planting date.
  • Transplanting Seedlings: Aim to transplant one to two weeks after the last frost date, ensuring the soil is at least 65°F (18°C) and nighttime temperatures are above 50°F (10°C). Be mindful not to disturb the roots during transplanting to avoid shock.

How Long Does It Take Cantaloupe to Grow from Seed

Patience is rewarded when growing cantaloupe. Typically, cantaloupe plants produce ripe melons about 85 days after transplanting. For instance, the ‘Hearts of Gold’ variety is ready to harvest in 80 to 90 days. If you start seeds indoors, expect to enjoy your melons about two weeks earlier than those grown from direct seeding.

Growing Cantaloupe in Containers

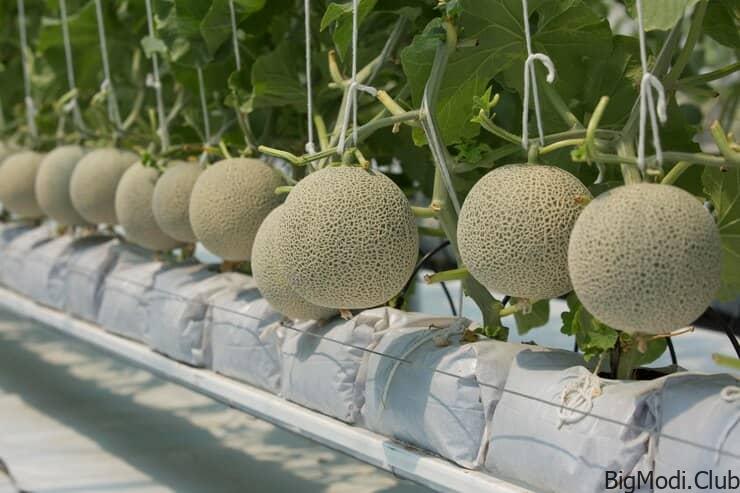
Container Requirements: To successfully grow cantaloupes in containers, you’ll need an extra-large container—think along the lines of a half whiskey barrel or at least one that holds 5 gallons (19 liters) of potting soil. Dwarf varieties like ‘Minnesota Midget,’ which yields 3-pound melons, and ‘Sugar Cube,’ producing melons around 2 pounds, are ideal choices for container gardening.

Support and Location: A trellis is essential to keep the vines elevated and prevent the melons from rotting. If you’re growing full-size varieties, additional support such as netting, old pantyhose, or cloth slings will be necessary to cradle the fruit and prevent them from detaching prematurely. Be sure to place your container in a location where it receives at least eight hours of bright sunlight daily.

Planting and Soil: Start by filling your container nearly to the top with high-quality potting soil mixed with perlite or vermiculite to enhance moisture retention. Add a small amount of slow-release fertilizer. About two weeks after the last frost date, plant four or five seeds, covering them with an inch of potting soil.

Watering and Fertilization: Keep the soil consistently moist until the seeds germinate, then water regularly. Once the melons reach the size of a tennis ball, reduce watering, only irrigating when the soil is dry and the leaves show signs of wilting. After five weeks, the initial slow-release fertilizer will lose its effectiveness, so switch to a general-purpose, water-soluble fertilizer diluted to half strength every two to three weeks.

Thinning and Harvesting: When the seedlings develop two sets of true leaves, thin them down to the strongest three plants by cutting the weaker ones at soil level. Harvest your melons when they feel heavy for their size and can be easily separated from the vine. A ripe melon will typically have a yellowish rind between the whitish “netting.”

How to Grow Cantaloupe Vertically

Choosing the Trellis Material: When growing cantaloupe vertically, selecting the right trellis material is crucial. Opt for strong and durable options like concrete reinforcing wire mesh, hog fencing, welded wire, or livestock panels. These materials should provide tight enough gaps for the vines to climb efficiently.

Trellis Structure: Consider whether you want to construct a tall trellis, an arbor, or a shorter vertical support. For an arbor, using PVC pipes can add the necessary strength to the arch. Ensure the support material is secured with solid posts, such as U-posts, steel posts, or sturdy wooden posts.

Construction and Support: After constructing the vertical support over your melon hill, securely fasten it with zip ties or wire. As the vines grow, they will naturally wind around the support structure.

Supporting the Melons: To prevent the melons from dropping off the vine as they mature, create slings using old nylons, t-shirt scraps, or other cloth materials. These slings should be tight enough to support the weight of the cantaloupes but still flexible enough to allow room for growth.

How Much Water Does Cantaloupe Need?

Watering Requirement: When grown in a 5.0″ pot without direct sunlight, cantaloupes require 0.8 cups of water every 9 days. Adjust watering frequency based on your specific growing conditions to ensure healthy growth.

Pruning Cantaloupe Vines

Pruning Benefits: While pruning cantaloupe vines isn’t strictly necessary, doing so can result in larger melons by allowing the plant to channel its energy into fewer fruits. Additionally, pruning can make trellising the vines easier, whether you use a net trellis or string and vine clips.

Pruning for Trellising: If you opt for pruning, focus on retaining the primary vine and removing the first lateral branch. Reduce the size of the remaining secondary branches using pruning shears, cutting the lateral vines up to the eighth leaf node. Leave 1-2 lateral vines untouched, and once melons begin to form, remove all but one fruit per vine.

Maintaining Vines: As the cantaloupe plant grows, regularly inspect the vines and remove any disfigured or damaged fruit and vines. This practice ensures that only the healthiest fruit remains, allowing them to grow to their maximum size and ripeness.

Homemade fertilizer for cantaloupe

Creating homemade fertilizer for cantaloupes offers a natural and cost-effective way to boost your melon crop, ensuring you enjoy larger, sweeter fruits while steering clear of harmful chemicals. Let’s explore how you can craft your own organic fertilizers using common household items.

The Case for Homemade Fertilizers

Why rely on expensive, store-bought fertilizers when you can create your own at home? Not only are homemade fertilizers more economical, but they also allow you to control what goes into your soil, ensuring that your food crops remain free from toxic chemicals. Plus, the nutrients they provide are essential for improving the vigor and productivity of your cantaloupe plants.

Epsom Salt: A Simple Yet Effective Solution

One of the easiest homemade fertilizers involves the use of Epsom salt. Known for its high magnesium content, Epsom salt can significantly enhance plant growth and improve the health of your cantaloupe vines. To create this simple fertilizer, dissolve half a tablespoon of unscented Epsom salt in half a gallon of cold water. This solution can be used to water your cantaloupe plants, providing a much-needed nutrient boost. It’s also particularly effective during the seed germination phase, helping to fortify young plants and give them a strong start.

Banana Peels: Potassium Powerhouse

Instead of tossing out your old banana peels, consider using them to enrich your garden soil. Banana peels are a fantastic source of potassium, which is crucial for the development and resilience of your cantaloupe plants. To create a banana peel fertilizer, simply dry the peels, grind them into a fine powder, and mix it into the soil around the base of your cantaloupe plants. This not only supplies potassium but also adds magnesium, nitrogen, phosphates, and calcium to the soil, all of which are vital for healthy plant growth.

Compost: The Ultimate Organic Fertilizer

When it comes to fertilizing cantaloupes, nothing beats good old compost. Made from decomposed organic matter like kitchen scraps and grass clippings, compost is rich in nutrients and beneficial microorganisms. It helps maintain soil temperature, improves moisture retention, and even aids in weed control. Whether you’re transplanting seedlings or looking to boost the growth of established plants, adding compost to the base of your cantaloupe plants is an excellent way to ensure they thrive.

Commercial Organic Fertilizers: A Convenient Alternative

If making your own fertilizer isn’t practical, don’t worry—there are plenty of natural and organic commercial fertilizers available. Products like Dr. Earth All Purpose Fertilizer offer a convenient way to nourish your cantaloupe plants without introducing harmful toxins into your garden. These products are designed to provide balanced nutrition, supporting the overall health and productivity of your plants.

Whether you opt for Epsom salt, banana peels, compost, or a commercial organic product, these homemade fertilizers can make a significant difference in the quality and yield of your cantaloupe crop. By choosing natural, homemade solutions, you’re not only promoting healthier plants but also contributing to a more sustainable and eco-friendly gardening practice.

Author

  • Eleanor Greenfield

    Eleanor Greenfield - A passionate home gardener with over 20 years of experience, Eleanor specializes in organic gardening and sustainable practices. She shares tips on growing vegetables, herbs, and flowers in small urban spaces.

    View all posts

Leave a Comment