If you’re wondering how to plant garlic in the fall, you’re in the right place! Garlic is one of those crops that’s not only a kitchen staple but also incredibly easy to grow—especially when you get the timing and preparation just right. Fall is the perfect season for planting garlic, and in this guide, I’ll walk you through everything you need to know to grow your own healthy garlic bulbs. From preparing the soil to proper mulching techniques, we’ve got all the details covered!
Why Plant Garlic in the Fall?
When it comes to planting garlic, timing is crucial. Planting garlic in the fall ensures that the bulbs have enough time to establish roots before winter. This gives them a jumpstart in the growing season and leads to bigger, healthier bulbs come harvest time. Garlic needs cooler temperatures to grow its roots but warmer conditions to mature, making fall planting ideal.
Best Time to Plant Garlic in the Fall
So, when exactly should you plant garlic? The best time to plant garlic in the fall is right after the autumnal equinox, which occurs in late September. But don’t worry if you miss this exact date. The general rule is to plant garlic about 2-4 weeks before the first hard frost hits your area. This allows the garlic to develop a robust root system before the ground freezes solid.
Think of garlic as a little powerhouse working undercover throughout the cold months. It’s quietly growing its roots, just waiting to surprise you with its vibrant green shoots when spring rolls around.
Factors That Affect Planting Time
Several factors can influence the exact time you should plant garlic:
- Climate Zone: Warmer regions may plant garlic later in the season, while colder zones should plant earlier in the fall.
- Soil Conditions: It’s crucial that your soil is workable when you plant. You want it to be loose and well-draining.
- Frost Dates: Track your local frost dates to ensure you’re giving the garlic ample time to develop roots.
Garlic Cloves Preparation
Now that you know the best time to plant garlic, let’s talk about the cloves themselves. The size of your garlic bulbs depends on how well you prepare and plant the cloves.
Separating Cloves for Planting
One essential step is separating the cloves from the garlic bulb. But don’t rush this process! You should only separate the cloves no more than 48 hours before planting. Why? If you separate them too early, they can dry out, and dry cloves won’t grow into healthy plants. The larger cloves are more likely to produce the biggest bulbs, so select your cloves wisely.
Planting Large Cloves for Bigger Bulbs
Ever wonder why some garlic bulbs are small and others are big and plump? It all starts with the clove size. The larger cloves you plant, the bigger the bulbs you’re likely to harvest. Think of it this way: A tiny seed leads to a tiny sprout, while a hefty seed gives you a robust plant.
When you’re planting garlic in the fall, keep this in mind to maximize your harvest!
How to Plant Garlic in the Fall
Now we’re getting to the good stuff—how to plant garlic in the fall step by step! Don’t worry; it’s easier than you think.
Step 1: Prepare the Soil
Before you plant, you’ll want to prepare your soil. Garlic thrives in well-draining, rich soil with a pH level between 6.4 and 6.8. If your soil is too compact, your garlic won’t have room to grow properly, and water might not drain as well as it should.
Add Compost and Manure
A key to growing big garlic bulbs is enriching your soil with organic matter. Add 2-3 inches of compost and well-rotted manure to your garden bed. This not only boosts nutrient levels but also improves the soil structure, making it easier for garlic roots to spread and thrive.
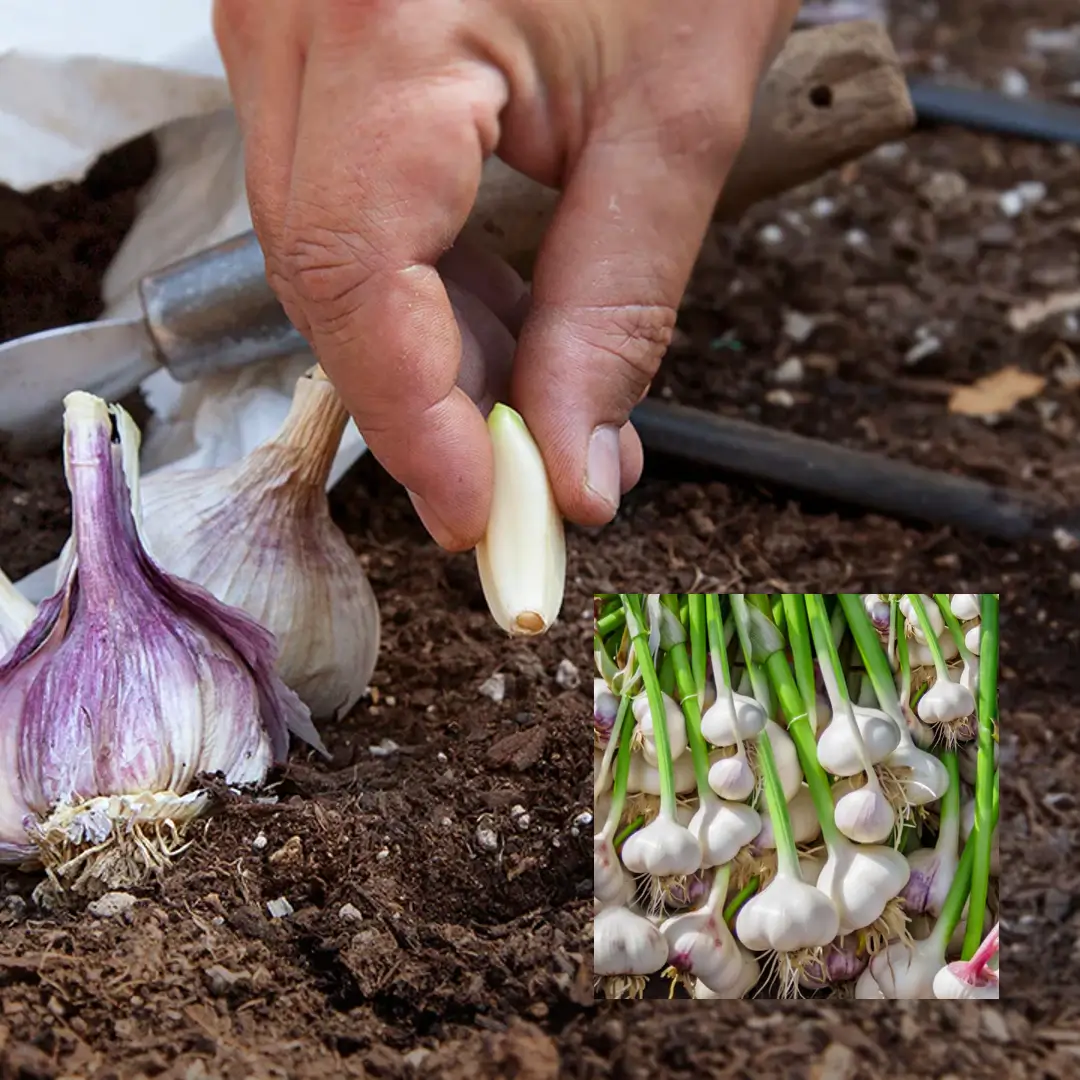
Step 2: Plant the Cloves
Once your soil is ready, it’s time to plant! Follow these simple steps:
- Peels On: Keep the peel intact on the cloves. This protects them as they grow.
- Pointy End Up: Always plant the clove with the pointy end facing up.
- Depth and Spacing: Plant each clove 2 inches deep and 6 inches apart. This spacing gives each plant the room it needs to grow without competing for resources.
Step 3: Mulching for Success
Mulching is a critical step when planting garlic in the fall. Garlic doesn’t like weeds (and let’s be honest, neither do we!), so mulching helps keep those pesky plants at bay.
How to Mulch Garlic Beds
Apply 5-8 inches of seedless straw over the garlic bed. By spring, the mulch will naturally compress to about 2 inches, creating the perfect environment for garlic to thrive. Mulch also helps regulate soil temperature, protecting the garlic during those harsh winter months.
Fall Garlic Growth
Once planted, garlic may not seem like it’s doing much—but don’t be fooled! Garlic works below the surface, developing roots throughout the fall and winter. You might see some small shoots, but don’t expect significant top growth until spring.
Fall Root Development
In the fall, garlic plants focus their energy on root growth. Strong roots are crucial for supporting healthy shoots and large bulbs when the warmer weather returns. As the ground freezes, garlic essentially “pauses” above ground, but the underground action continues!
Caring for Garlic Plants in the Spring
Once winter passes, and the ground thaws, garlic bursts into action. Here’s how to care for your garlic plants during the growing season:
Watering Needs
Garlic needs about 1 inch of water per week, including rainfall. This is especially important during the bulb-forming stage in early summer.
Fertilizing Garlic
Feed your garlic plants with a liquid fish emulsion fertilizer every other week starting from when the shoots emerge in early spring. This will provide them with the nutrients they need to grow large, flavorful bulbs.
Dealing with Garlic Scapes
If you’re growing hard-neck garlic, you’ll notice garlic scapes—those curly green stems—popping up in early summer. It’s important to cut these scapes off once they appear. Why? Doing so allows the plant to focus its energy on forming large garlic bulbs rather than producing seeds.
Bonus tip: Don’t toss the scapes! Garlic scapes are edible and delicious. You can chop them up and use them in stir-fries, soups, and even pesto for a mild garlic flavor.
Pests and Diseases in Garlic
While garlic is relatively pest-resistant, some problems can arise, particularly if the soil is too wet.
Common Garlic Pests
- Wireworms and Nematodes: These pests can damage garlic if present in the soil.
- Aphids: In some cases, aphids may feed on garlic plants, but they’re usually not a major issue.
Garlic Diseases
Garlic is susceptible to certain diseases, especially in poorly-draining soils. Make sure your garlic beds have excellent drainage to avoid fungal diseases like white rot or downy mildew.
Harvesting Garlic
Harvesting garlic is a bit of an art. You want to make sure you pull your garlic at the right time to avoid bulbs that are too small or overripe.
When do you Harvest Garlic
Typically, garlic is ready for harvest in late July to early August. A good rule of thumb is to check the leaves: when the lower third to half of the leaves have turned brown but the upper leaves are still green, it’s time to harvest.
How to Harvest Garlic
Carefully loosen the soil around the bulbs using a garden fork or trowel. Gently pull the bulbs from the ground, taking care not to damage them.
Storing Garlic
Once harvested, garlic needs to be cured before it can be stored long-term.
Curing Garlic
Hang the garlic bulbs in a cool, well-ventilated, shady spot for 3-4 weeks to dry. This process ensures that the garlic can be stored without rotting.
Long-Term Storage
After curing, trim the roots and cut back the tops to about an inch above the bulb. Store your garlic in a cool, dry place where temperatures hover around near freezing with 65-70% humidity. Under these conditions, hard-neck garlic can last for 5 months, while soft-neck varieties may keep for up to 8 months.
Planting garlic in the fall is one of the simplest and most rewarding gardening tasks you can tackle. By following these steps, you’ll be well on your way to harvesting big, flavorful bulbs next summer. Just remember: good soil preparation, careful planting, and proper mulching are the keys to success. Whether you’re a seasoned gardener or just starting out, learning how to plant garlic in the fall will elevate your garden and your cooking. So, why not give it a try this season?
FAQs:
What month is best to plant garlic?
The best month to plant garlic is typically October, depending on your climate. However, you can plant garlic anytime from late September to early November. The key is to get the garlic in the ground 2-4 weeks before the first hard frost, which allows the cloves to establish strong roots before winter sets in. In warmer climates, you can plant garlic later in the season, even into December.
How long does garlic need to be cold before planting?
Garlic needs a cold period, also known as vernalization, before it can properly grow. Ideally, garlic cloves should experience 4-8 weeks of cold temperatures (around 40°F/4°C or lower) before they are planted. This cold exposure signals to the garlic that it’s time to grow, leading to larger bulbs in the spring. Many gardeners naturally achieve this by planting garlic in the fall, so it experiences the winter chill in the ground.