
Ginger is a versatile and popular plant that can be grown in many different climates, from tropical regions to cooler zones. Whether you’re a seasoned gardener or just starting, learning how to grow ginger in any climate can be a rewarding experience. This guide will walk you through the essential steps and tips to cultivate ginger successfully, no matter where you live.
Why Grow Ginger?
Ginger is not only a delicious addition to your meals but also offers various health benefits. It’s widely used in cooking, baking, beverages, and even natural remedies. Growing your own ginger allows you to enjoy fresh, organic ginger whenever you need it. The best part? Ginger can thrive in a variety of climates, as long as you provide the right growing conditions.
Benefits of Growing Ginger
- Fresh Ginger at Your Fingertips: Homegrown ginger can be used fresh in teas, curries, smoothies, and more.
- Health Benefits: Ginger has anti-inflammatory properties and can help with digestion, nausea, and even pain relief.
- Sustainable Gardening: Growing ginger yourself reduces the need to buy store-bought ginger, which is often grown using chemicals and preservatives.
Understanding Ginger’s Growing Conditions
Before you dive into planting ginger, it’s essential to understand the growing conditions it requires. Ginger is a tropical plant that thrives in warm, humid environments. However, with the right care and adjustments, you can grow ginger in both cold climates and indoor spaces.
Ideal Growing Conditions for Ginger
Temperature and Climate Needs
Ginger prefers temperatures between 75°F to 85°F (24°C to 29°C) for optimal growth. In cooler climates, growing ginger outdoors may be challenging unless you live in a tropical or subtropical zone. However, growing ginger in cold climates is still possible with some modifications, such as using containers or bringing the plant indoors during the winter months.
- Key Tip: If you’re growing ginger in a cooler region, consider starting your ginger indoors and transitioning it outside when the weather warms up.
Soil Requirements for Ginger
Ginger thrives in rich, well-draining, loamy soil. The soil should be light and airy to prevent waterlogging, which can cause root rot. For optimal growth, mix organic compost into your soil to enrich it with nutrients. This will help create the perfect environment for ginger rhizomes to develop and flourish.
- Key Tip: Ginger doesn’t like heavy, clay-based soils. If your soil is dense, add sand or perlite to improve drainage.
Humidity and Watering Needs
Ginger is a tropical plant that thrives in high humidity. If you’re growing ginger indoors, you’ll need to simulate its natural environment by maintaining a humid atmosphere. Misting your ginger plant occasionally or using a humidity tray can help maintain the necessary moisture levels. If you live in a hot climate, regular watering is essential, but make sure the soil doesn’t become soggy, as ginger plants don’t tolerate standing water.
- Key Tip: Ensure the soil remains moist but not waterlogged. Overwatering can lead to root rot, which is harmful to ginger plants.
In First Part, we covered the ideal growing conditions for ginger, including temperature, soil, and humidity requirements. Now, let’s dive into the practical steps for planting, caring for, and harvesting ginger, whether you’re growing it indoors, in pots, or outdoors in your garden. Follow these simple guidelines to ensure your ginger thrives in any climate.
Step-by-Step Guide: How to Grow Ginger Indoors and Outdoors
Ginger is incredibly versatile and can be grown successfully in both indoor and outdoor environments. The following sections will break down how to grow ginger in each setting, ensuring you get the best results no matter where you live.
Growing Ginger Indoors
If you’re living in a cold climate or simply prefer the convenience of growing ginger indoors, this method is perfect for you. Growing ginger indoors allows you to control the temperature, humidity, and light, creating a perfect environment for healthy plant growth.
1. Choosing the Right Container
To grow ginger indoors, select a wide, shallow container that provides enough room for the ginger rhizomes to spread horizontally. A container that is at least 12 inches deep is ideal, but the width is more important to accommodate the plant’s growth.
- Tip: Use a container with good drainage holes to prevent water from collecting at the bottom, which can lead to root rot.
2. Preparing the Soil and Planting Ginger Rhizomes
Fill the container with well-draining potting soil, enriched with organic compost for added nutrients. Ginger thrives in loose, rich soil, so make sure to mix it well.
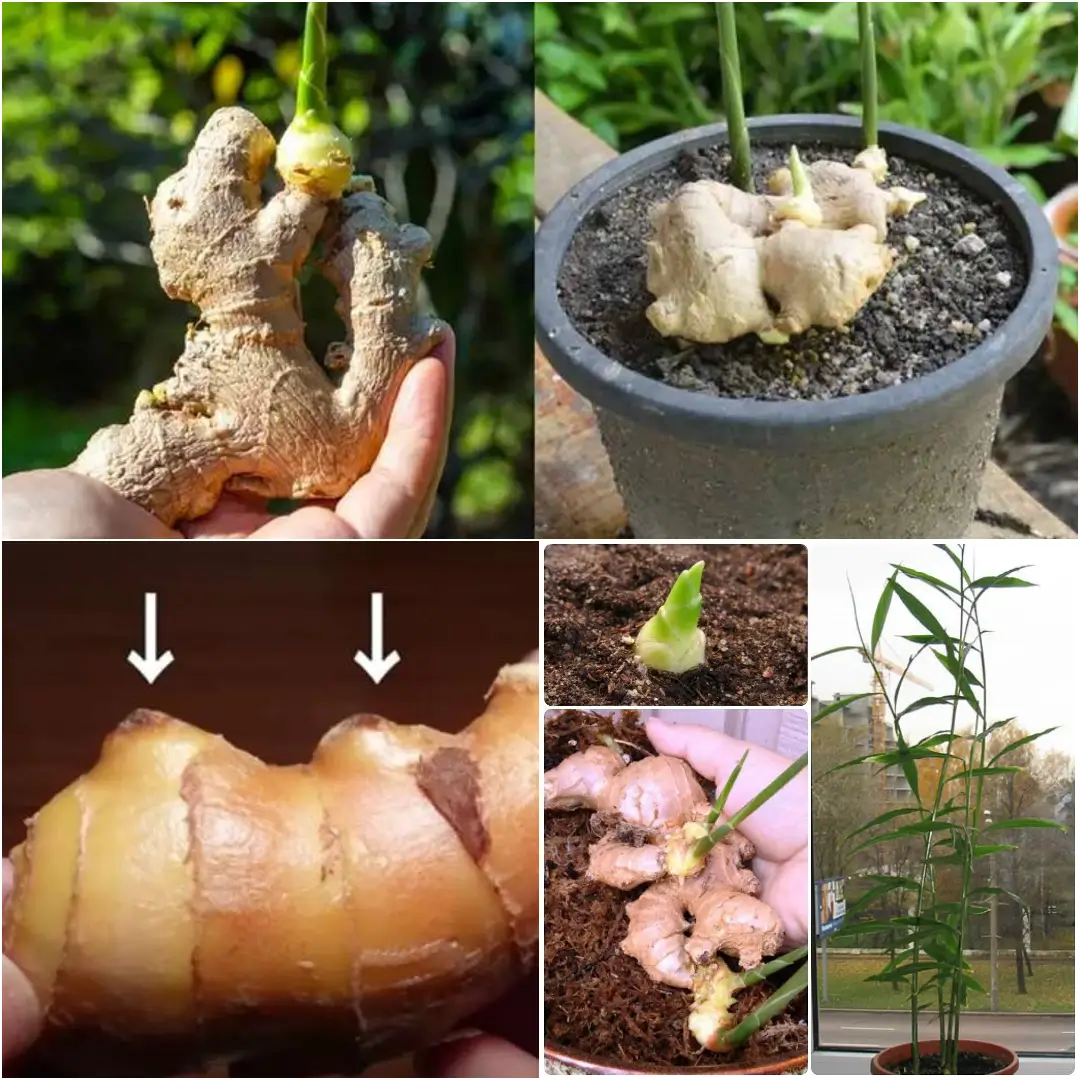
- Plant the ginger rhizomes with the buds pointing upward, just beneath the surface of the soil.
- Leave about 2-4 inches between rhizomes to allow them room to grow.
3. Providing Light and Humidity
Ginger needs bright, indirect light to grow properly. Place the container near a sunny window but out of direct sunlight to avoid burning the leaves. If sunlight is limited, you can also use grow lights to supplement natural light.
- Tip: To keep humidity high, mist your ginger plant occasionally or use a humidity tray (a shallow tray filled with pebbles and water). This will mimic the humid conditions ginger naturally prefers.
4. Watering and Temperature Control
Ginger needs consistent moisture but doesn’t tolerate soggy soil. Keep the soil moist, but not wet, by watering it regularly. In terms of temperature, ginger does best in temperatures ranging from 75°F to 85°F (24°C to 29°C). If your indoor space is cooler, consider using a space heater or a heat mat to maintain warmth.
- Tip: Avoid placing your ginger plant near drafts or air conditioning units, as they can dry out the plant.
Growing Ginger Outdoors
For those in warmer climates, growing ginger outdoors is a fantastic option. Ginger can be planted directly in the ground in areas that have consistently warm temperatures and tropical or subtropical climates. However, it can also be grown in containers that you can move around based on the weather.
1. Selecting the Right Location
Choose a spot that receives filtered sunlight. Ginger doesn’t like direct sunlight for extended periods as it can cause the leaves to burn. Look for a shaded area that still receives some light throughout the day.
- Tip: If you’re in a hot climate, a spot with morning sun and afternoon shade is ideal for ginger plants.
2. Planting Ginger in the Ground
Before planting, prepare the soil by adding compost to improve its fertility and drainage. Plant the ginger rhizomes about 2-4 inches deep, with the buds facing up. Space the rhizomes at least 6-8 inches apart to give them room to grow.
- Tip: If your soil is heavy, consider using raised beds or planting ginger in containers to help with drainage.
3. Maintaining the Right Moisture Levels
Ginger requires regular watering, but make sure the soil doesn’t stay too wet. Overwatering can cause root rot. Water the plant deeply once the soil feels dry to the touch, but let the excess water drain out.
- Tip: Mulching around your ginger plant helps retain moisture and keeps the soil temperature stable.
4. Protecting Ginger from the Elements
If you’re growing ginger outdoors in a cooler climate or during the colder months, you may need to bring the plant inside or use a greenhouse to protect it from frost. You can also cover the plant with a row cover or garden blanket during colder nights to retain warmth.
Ginger Care: Essential Tips for Healthy Growth
Once your ginger is planted, ongoing care is essential to ensure it grows healthy and strong. Here are some tips to help you maintain your ginger plant and promote optimal growth, whether it’s grown indoors or outdoors.
1. Watering Ginger Plants
Ginger thrives in consistently moist soil. However, it’s crucial not to overwater, as standing water can lead to root rot. Check the soil regularly by sticking your finger into the ground. If it feels dry, water your ginger. If it feels damp, wait a few days before watering again.
- Tip: Ensure your container has adequate drainage to prevent excess moisture.
2. Fertilizing Ginger Plants
Feed your ginger plant every 4-6 weeks with a balanced liquid fertilizer to encourage strong growth. Ginger benefits from organic fertilizers such as fish emulsion or compost tea. Avoid over-fertilizing, as this can cause the plant to grow too quickly without producing healthy rhizomes.
3. Dealing with Pests and Diseases
Ginger is generally resilient against pests, but it’s important to keep an eye out for common issues like aphids, spider mites, and fungal infections. Inspect your plant regularly, and remove any affected leaves or stems. If pests become problematic, you can treat the plant with a mild insecticidal soap or neem oil.
- Tip: Maintaining proper spacing between plants ensures better air circulation, which helps reduce the risk of fungal diseases.
4. Harvesting Ginger
Ginger takes about 8-10 months to fully mature. You’ll know it’s ready to harvest when the leaves start to turn yellow and dry out. For baby ginger, you can harvest earlier, typically after 4-6 months, when the rhizomes are still tender and small.
- Tip: To harvest, gently dig around the base of the plant and carefully lift the rhizomes out of the soil. You can cut off the outer rhizomes and leave the inner part of the plant to grow again for future harvests.
Now that you’ve successfully planted and nurtured your ginger plants, it’s time to explore the final stages: harvesting and storing your ginger. Whether you’ve grown your ginger in indoor containers or outdoor garden beds, knowing the right time to harvest and the best ways to store it ensures that your hard work pays off. In this section, we’ll cover the essentials of harvesting ginger and offer storage tips to help you enjoy your fresh, homegrown ginger year-round.
How to Harvest Ginger: Knowing the Right Time
Ginger typically takes about 8-10 months to mature, but the timing of your harvest depends on the type of ginger you want. You can choose to harvest mature ginger or baby ginger, depending on your preferences. Understanding when and how to harvest will ensure you get the best results from your ginger plants.
1. Signs That Ginger Is Ready to Harvest
Ginger is ready to be harvested when the plant’s leaves start to yellow and die back. This usually occurs towards the end of the growing season, around 8-10 months after planting. If you’re growing baby ginger, you can harvest it earlier when the rhizomes are still small, tender, and less fibrous.
- Tip: Ginger rhizomes are typically mature when they are firm and well-developed. You can gently pull back the soil to check the size of the rhizomes before deciding to harvest.
2. How to Harvest Ginger Rhizomes
Harvesting ginger requires a bit of care, especially if you want to preserve the plant for future harvests. Here’s how you can do it:
-
Use a small shovel or garden fork to carefully dig around the ginger plant.
-
Gently lift the entire plant, being cautious not to damage the rhizomes.
-
Trim off the outer rhizomes with a sharp knife or scissors, leaving the core of the plant intact so it can continue growing.
- Tip: If you want to harvest only a few rhizomes, you can pull back the soil and carefully cut off a portion of the rhizome, leaving the rest to grow.
3. Harvesting Baby Ginger
If you prefer baby ginger, which is harvested earlier and is smaller and tender, you can start pulling the plant around 4-6 months after planting. Baby ginger has a delicate, mild flavor and is often used fresh in recipes or for juicing.
- Tip: Baby ginger is perfect for pickling or using in fresh dishes like salads or smoothies.
Storing Ginger: Maximizing Freshness and Flavor
Once you’ve harvested your ginger, it’s important to store it properly so it maintains its freshness and flavor. Whether you’ve harvested ginger for immediate use or have a larger yield to store for later, here are the best storage methods to keep your ginger fresh for months.
1. Storing Fresh Ginger
Freshly harvested ginger can last for up to three weeks if stored properly. For short-term storage, keep the ginger in a cool, dry place like a pantry. Make sure the rhizomes are not exposed to direct sunlight, as this can cause them to dry out.
- Tip: Store ginger in a paper bag or a breathable container to prevent moisture buildup, which can lead to rot.
2. Refrigerating Ginger
If you plan to use the ginger within a few weeks, you can store it in the refrigerator. Place the fresh rhizomes in a plastic bag or container with a small amount of air circulation. Keep the ginger in the vegetable crisper drawer for optimal storage conditions.
- Tip: To prevent the ginger from drying out, wrap it in a damp paper towel before storing it in the fridge.
3. Freezing Ginger
For long-term storage, freezing ginger is a great option. Freezing preserves the flavor and nutrients of your ginger for several months. To freeze ginger, follow these steps:
-
Peel the ginger using a spoon or knife, then slice or grate it into smaller portions.
-
Place the ginger pieces in a freezer-safe bag or container. Label the bag with the date for easy tracking.
-
You can freeze ginger either in whole pieces, slices, or grated for added convenience in cooking.
-
Tip: When you need frozen ginger, you can grate or slice it directly from the freezer without thawing.
4. Drying Ginger
Drying ginger is another method for long-term storage. Once dried, ginger can be used in powdered form or as dried slices for infusions. To dry ginger, follow these steps:
-
Peel the ginger and slice it into thin pieces.
-
Use a dehydrator or an oven on a low heat setting (around 100°F or 38°C) to dry the ginger slices.
-
Once dried, store the ginger in an airtight container in a cool, dark place.
-
Tip: Dried ginger can be ground into ginger powder for use in baking, smoothies, and teas.
Tips for Storing Ginger and Using It Year-Round
Now that you know the best ways to store ginger, here are a few additional tips for ensuring you enjoy your homegrown ginger all year long.
1. Keep Ginger Fresh with Proper Air Circulation
Whether you store your ginger in a pantry, refrigerator, or freezer, make sure it is in a container that allows air circulation. Too much moisture can lead to mold growth, which can spoil your ginger quickly.
- Tip: Use a paper bag or mesh bag to store ginger, as these options allow the ginger to breathe.
2. Use Ginger Immediately After Harvesting
While ginger can be stored for several months, it’s always best to use it fresh if possible. Fresh ginger has a more vibrant flavor and can be used in a wide range of dishes, from stir-fries to teas.
3. Freeze Ginger in Small Portions
If you have a large harvest, freeze ginger in small, portioned amounts so you can easily grab a small amount when needed. This is especially convenient for grated or sliced ginger, which you can use directly from the freezer.
Final Tip for Success:
Growing ginger in any climate is not just possible, it’s highly achievable with the right planning, care, and techniques. Whether you’re nurturing your ginger indoors in containers or cultivating it outdoors in your garden, the key to success lies in creating the best possible growing environment for your plant. Here’s a final tip to ensure you succeed:
Consistency is Key
The most important factor in growing ginger is consistency. Ginger plants thrive when they have consistent warmth, moisture, and care. Make sure to water your plant regularly without over-watering, maintain the right temperature, and provide adequate light. Don’t forget to fertilize your ginger every few weeks with a balanced organic fertilizer to promote strong growth.
By staying consistent with these care practices, your ginger plant will flourish and reward you with delicious, fresh rhizomes ready for harvest.
Ready to grow your own ginger? There’s no better time than now to start! Growing ginger can be a fun and rewarding experience, whether you’re cultivating it on a windowsill indoors or in your backyard garden. Follow the steps outlined in this guide, select the best rhizomes to plant, and ensure you provide the proper care throughout the growing season.
Whether you’re aiming for fresh baby ginger or maturing rhizomes for cooking, you can make it happen. With patience and a little effort, you’ll soon be harvesting your own ginger and enjoying its aromatic, spicy flavor in all your favorite recipes.