
Have you ever thought about Regrow Garlic at home? It’s easier than you might think! Garlic is not only a kitchen staple, but it’s also a rewarding crop to grow in your own backyard. Plus, you’re just one grocery trip away from planting your very own garlic garden. Growing garlic at home means having fresh, organic bulbs at your disposal whenever you need them. Whether you’re a seasoned gardener or a newbie, Regrow Garlic is a simple yet fulfilling project that’ll make your home cooking even more flavorful.
Let’s dive into the tools, materials, and step-by-step process to get started!
Tools and Materials You Will Need
Before you jump into planting, it’s important to gather a few essentials. Fortunately, garlic is a low-maintenance plant, so you won’t need anything fancy.
Garlic Bulbs
First things first, you’ll need some garlic bulbs. These can be bought from your local grocery store, and we’ll talk more about choosing the right ones later.
Gardening Tools
You won’t need much more than a good garden trowel and maybe a pair of gardening gloves. A spade might come in handy too, especially when working the soil.
Organic Compost
Organic compost is crucial because it enriches the soil, giving your garlic the nutrients it needs to thrive. Decomposed plant matter like leaves and vegetable scraps make for excellent compost.
Fertilizer
Fertilizer will give your garlic an extra boost, especially as it begins to grow. A slow-release fertilizer works best for garlic plants.
Step 1: Buying the Right Garlic from the Grocery Store
How to Pick the Best Garlic Bulbs
Not all garlic is created equal. When selecting garlic bulbs from the grocery store, make sure they are plump, firm, and still have their skin on. Avoid any bulbs that feel soft or have started to dry out.
Importance of Keeping the Garlic Skin Intact
Keeping the skin intact helps preserve the moisture and nutrients in the garlic until you’re ready to plant. Don’t peel it until it’s time to separate the cloves for planting.
Step 2: Testing Garlic for Chemical Treatment
Why Some Garlic is Chemically Treated
Did you know some garlic producers treat their bulbs with chemicals to prevent sprouting? While this might be great for storage, it’s not ideal if you want to plant them.
How to Test Garlic for Chemicals
Here’s an easy test: Leave your garlic in the fridge for two weeks. If you see little green shoots starting to appear, your garlic is good to go! If not, it may have been treated, and you should try a different bulb.
Step 3: Preparing the Planting Area
Ideal Location for Growing Garlic
Garlic likes a sunny spot. Choose an area in your garden that gets at least 6 hours of sunlight each day. The more sun, the better.
Importance of Soil Drainage
Waterlogged soil is a garlic killer. Make sure your planting area is well-drained to avoid rotting. You can even add some sand to the soil if needed.
Sunlight Requirements for Garlic
Garlic thrives in full sunlight. If it doesn’t get enough sun, you might end up with small, underdeveloped bulbs.
Step 4: Timing Your Garlic Planting
Best Time to Plant Silverskin Garlic
Silverskin garlic is tough and grows best when planted in winter. Cold temperatures help the bulbs mature properly.
Creole Reds: A Spring Garlic Option
If you’re planting Creole Reds, aim for the spring. These garlic varieties prefer warmer temperatures for sprouting.
Step 5: Preparing the Garlic Cloves for Planting
Separating the Cloves
Carefully break apart the garlic bulb into individual cloves. But don’t peel off the skin from each clove—this protects the garlic as it begins to sprout.
Leaving the Skin Around the Clove Intact
Keeping the skin on the clove is key to helping it retain moisture and nutrients, which promotes healthy growth.
Step 6: Preparing the Soil for Garlic
Digging and Working the Soil
Garlic prefers loose, well-tilled soil. Dig about 10 inches deep and break up any clumps. This gives the roots plenty of room to grow.
Adding Organic Compost for Nutrients
Work a layer of organic compost into the soil. This gives your garlic a nutrient-rich environment and promotes healthy bulb development.
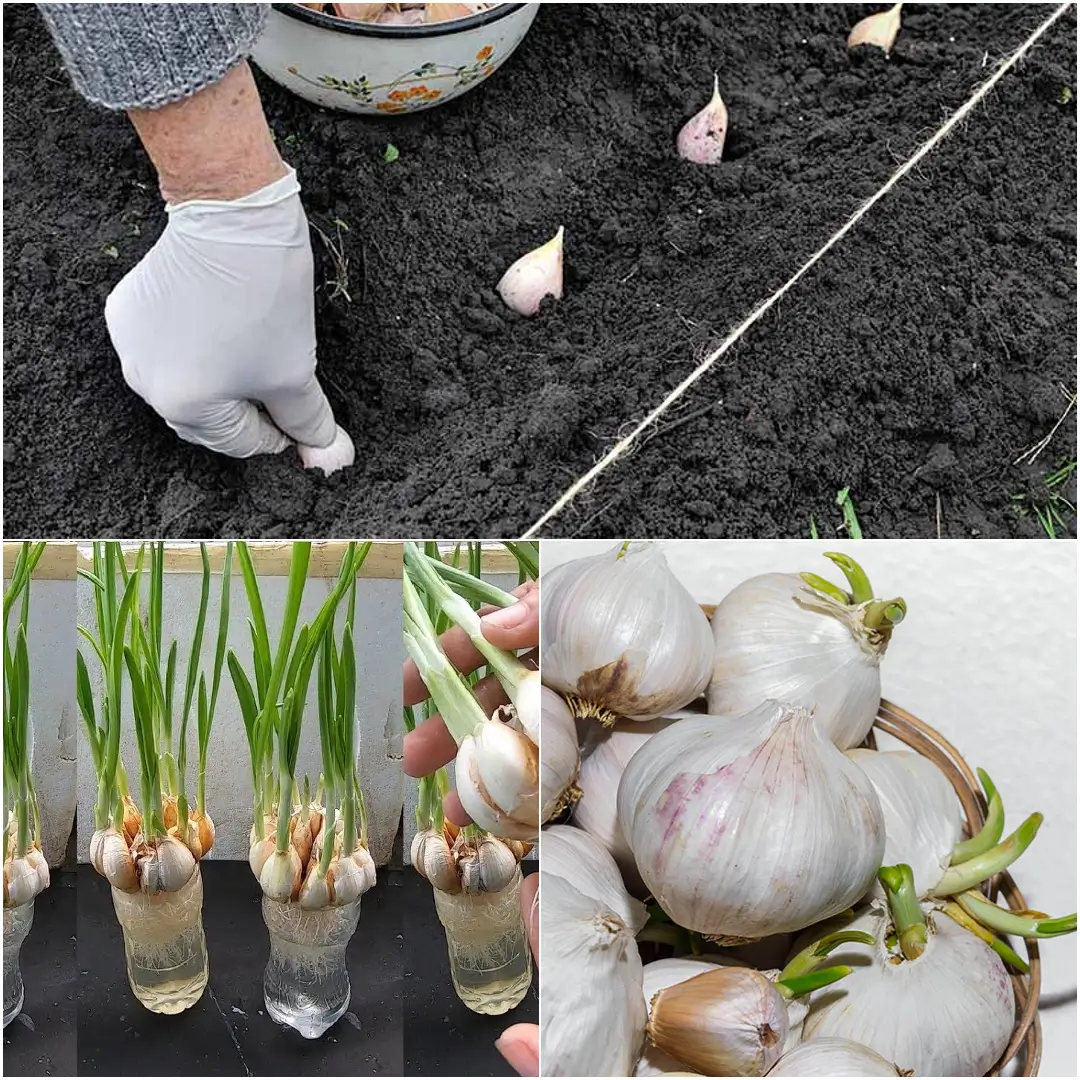
Step 7: Planting Garlic: How Deep and Which Way Up
Placing the Cloves Tip-Up
When planting, make sure the pointy tip of each garlic clove is facing upwards. This is where the green shoots will sprout from.
The Ideal Planting Depth for Garlic
Plant each clove about 2 inches deep. This protects the clove from frost in colder months and ensures healthy growth.
Step 8: Spacing the Garlic Cloves Properly
Why Spacing Matters
Overcrowding can hinder your garlic’s growth. When cloves are too close together, they’ll compete for nutrients and space.
Recommended Spacing for Optimal Growth
Space each clove 4 to 6 inches apart. This will give each garlic plant plenty of room to grow big and healthy.
Step 9: Fertilizing and Watering Your Garlic Garden
How Often to Fertilize Garlic
For the best results, fertilize your garlic every two weeks. A slow-release fertilizer will ensure that your plants get a steady supply of nutrients.
Proper Watering Techniques
Water your garlic regularly, but be careful not to overdo it. The soil should be moist but not soggy. After nine weeks, you can begin to reduce the amount of water.
Reducing Watering Over Time
As your garlic nears maturity, decrease the watering frequency. Overwatering at this stage can cause the bulbs to split and lose flavor.
Step 10: Harvesting Your Garlic
Signs That Your Garlic is Ready for Harvest
After about three to four months, the green tops of your garlic will start to dry out and turn yellow-brown. This is your signal that it’s time to harvest. Once harvested, you can save a few bulbs to Regrow Garlic for the next season, ensuring a continuous supply of fresh garlic. Regrowing garlic is a simple way to enjoy homegrown bulbs year after year!
How to Properly Harvest Garlic
Carefully dig up the garlic bulbs without damaging them once you notice the tops of the garlic plants turning yellow or brown—it’s time to act! Gently dig around the base of each garlic plant using a garden fork or spade. Be careful not to puncture or damage the bulbs, as this can affect their longevity. Once loosened, gently pull the bulbs out of the soil. After harvesting, you can Regrow Garlic by saving a few of the healthiest bulbs to plant for the next season! Regrowing garlic is a simple and effective way to continue enjoying fresh garlic year after year. So, don’t miss the opportunity to Regrow Garlic from your harvest!
After harvesting, brush off any excess dirt but don’t wash the garlic just yet. It’s best to let the bulbs cure (dry out) in a cool, dry place with good ventilation for about two weeks before cleaning and storing them. Curing helps improve flavor and extends the shelf life of your garlic. Once cured, you can use the bulbs or even save some to Regrow Garlic for your next planting season. Regrowing garlic is a great way to keep your supply going year after year! You’ll find that it’s rewarding to Regrow Garlic from your own harvest, ensuring fresh, homegrown garlic whenever you need it.
FAQs:
Can I plant a sprouted garlic clove?
Yes, you can plant a sprouted garlic clove! In fact, sprouted cloves are often a good indicator that they are healthy and ready to grow. Just make sure to plant them with the sprout facing upwards. They should take root and grow into a full bulb, so don’t hesitate to give those sprouted cloves a chance in your garden! It’s a great way to Regrow Garlic and make the most out of your kitchen leftovers.
How to propagate garlic?
To propagate garlic, you primarily use the cloves from a garlic bulb. Here’s how to Regrow Garlic:
- Choose Healthy Bulbs: Start with healthy, untreated garlic bulbs. Look for ones that are firm and free of any blemishes.
- Separate the Cloves: Gently break apart the bulb into individual cloves, leaving the skin on each clove intact.
- Prepare the Planting Area: Select a sunny spot in your garden and prepare the soil, making sure it’s well-drained.
- Plant the Cloves: Plant each clove about 2 inches deep with the pointed end facing up and space them 4 to 6 inches apart.
- Care for Your Garlic: Water regularly and fertilize as needed. Once the garlic is ready (usually in 3 to 4 months), you can harvest and enjoy your fresh garlic!
Can I grow garlic indoors?
Yes, garlic can be grown indoors, but it requires plenty of sunlight. Make sure to place the garlic near a window where it gets at least 6 hours of sunlight a day. You’ll also need a container with good drainage to prevent waterlogging. By following these steps, you can successfully Regrow Garlic indoors and enjoy fresh garlic right from your kitchen. It’s a convenient way to ensure a continuous supply of this essential ingredient!